This was my first journey into Central America. I’ve been to Europe a few times, so I was ready for something a bit different. However I was also nervous about striking out into this new area of the world, so I wanted something I could manage. I’d heard that Costa Rica could be expensive (compared to the rest of Central America), but also beautiful and relatively easy to travel. And so I booked the flight. This was my Costa Rica itinerary.
Now compared to a lot of itineraries online (and compared to a lot of people we met), our itinerary is relatively simple. We stuck to two main places: Monteverde & Uvita. The mountains and the beach. We could have bounced around to a new place every day or two, but we wanted to reduce the amount of days we were actively traveling.
I wouldn’t have changed anything about my Costa Rica itinerary.
Days 1 – 4: Monteverde
Day 1: Get To Monteverde
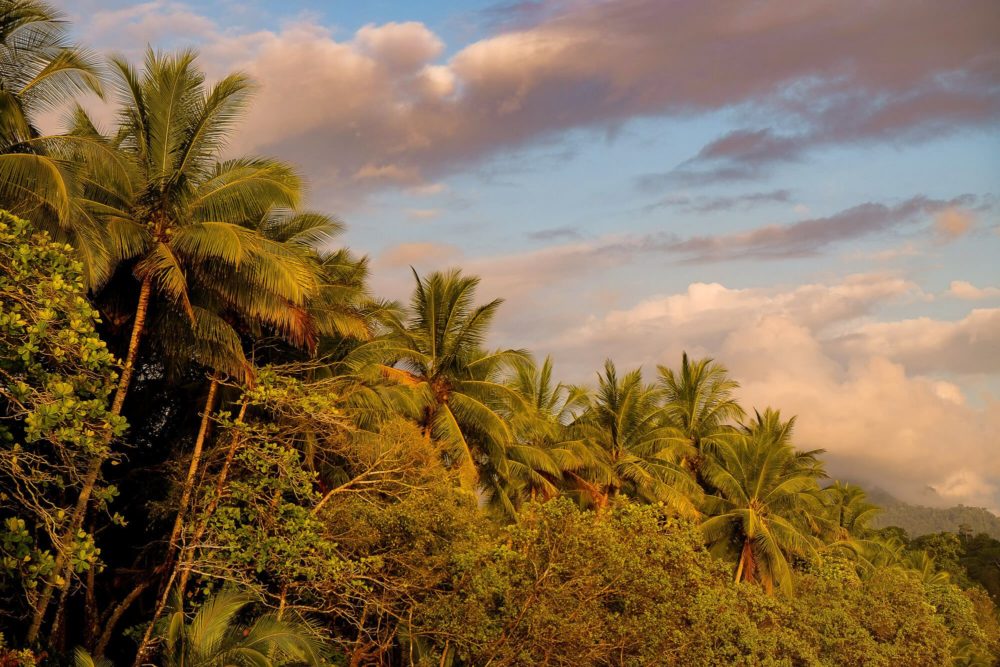
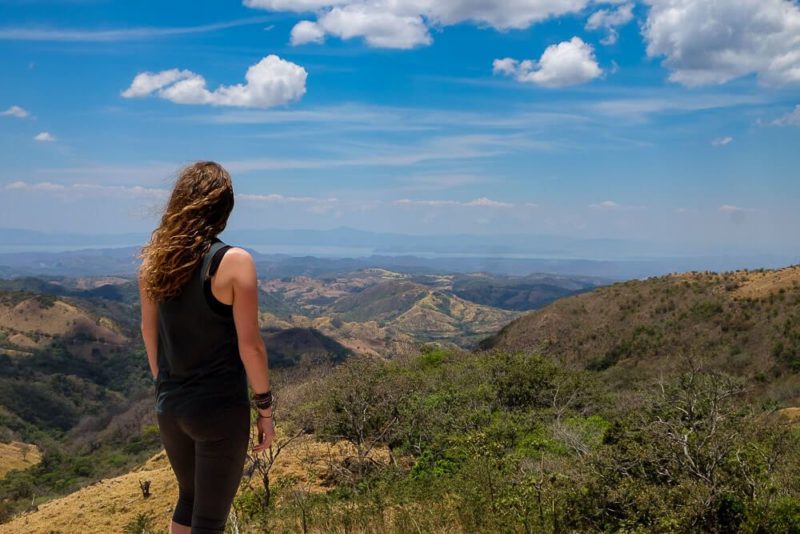
Our decision of Monteverde was an easy one. I wanted cloud forests and wildlife. And Ryan wasn’t really interested in seeing Arenal. And so we decided to spend our “mountain” time based in and around the Monteverde area.
Now unfortunately you can’t fly into Monteverde. And Monteverde is in the mountains so it’s going to take some time to get there.
Plan for this.
We arrived in San Jose at about 1:30pm. It easily took us over an hour to get through immigration. (Unfortunately we were at the back of the plane.)
By the time we got through immigration, got our bags, took the shuttle to the car rental place (so much traffic), and went through all the car rental shenanigans, it was probably around 4pm (maybe even pushing 5).
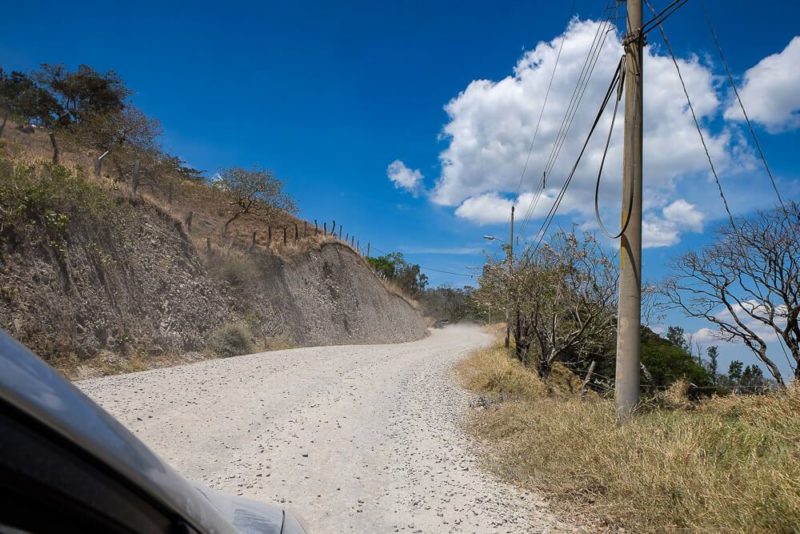
The drive to Santa Elena (the actual town near the Monteverde Cloud Forest) took us a good 4 hours. There was a lot of traffic heading out of San Jose and then the last 18 or so miles into Santa Elena was all on a dirt, steep road.
Night had fallen by the time we rolled into Monteverde. And it was raining. Welcome to driving in Costa Rica.
We got checked in easily (our lodge was so nice!). But we only had enough strength to grab some dinner and fall into bed.
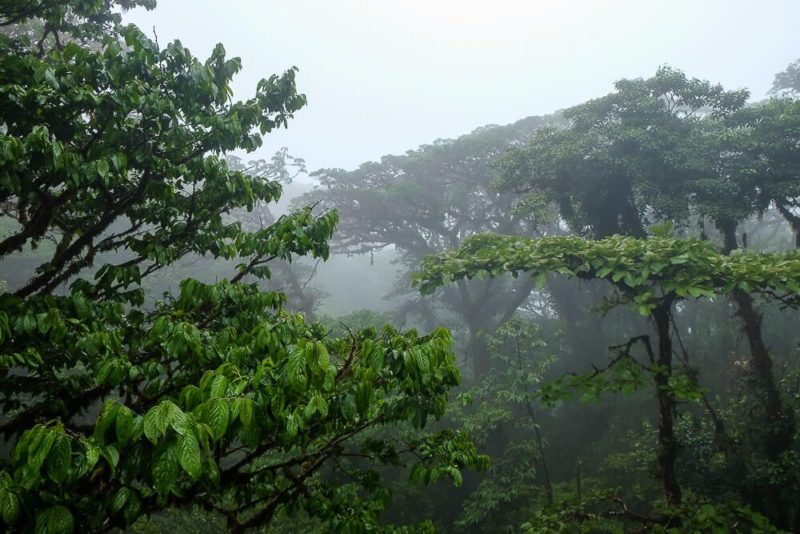
Day 2: Self Guided Hike In The Monteverde Cloud Forest
We didn’t book anything for this day. So instead we were able to wake up leisurely, grab some breakfast at the Orchid Cafe, and head to the cloud forest.
And even though the reserve does offer its own tours, we decided to do it on our own. And we saw plenty.
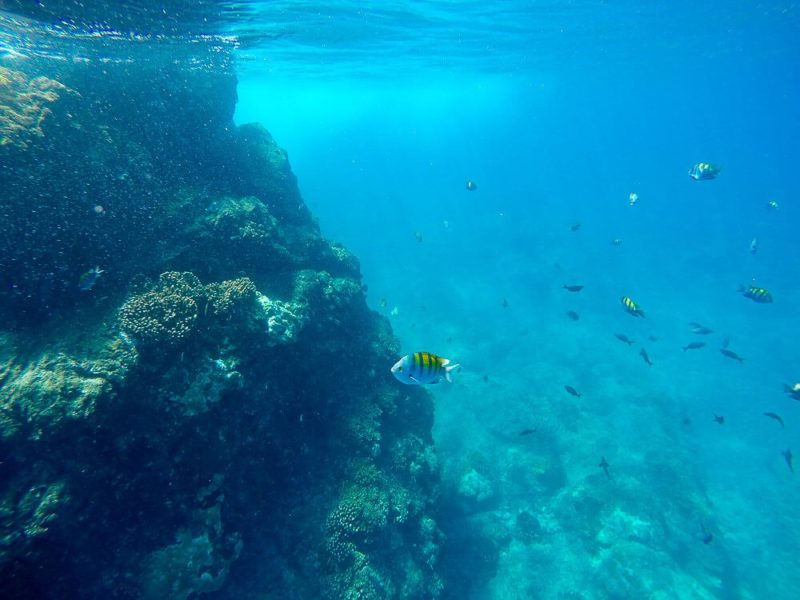
Now the road to the cloud forest goes from pavement to a very steep dirt/rocky hill as you reach the outskirts of Santa Elena. This dirt section starts right by a gas station. And at first Ryan and I didn’t even realize it was a road. It was only after watching all the cars drive up and down it that we realized that was the right way.
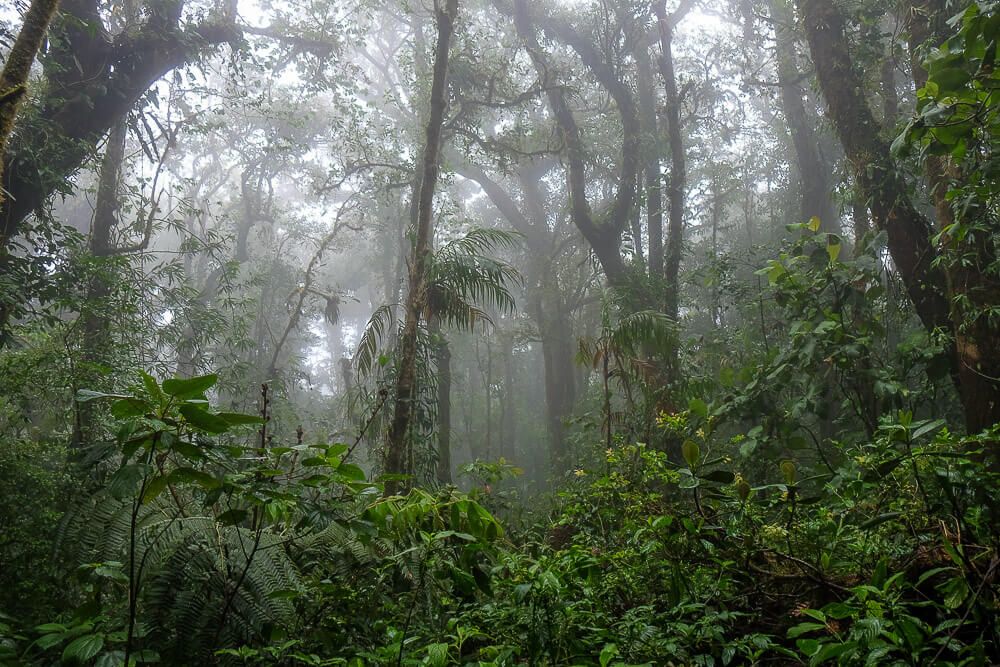
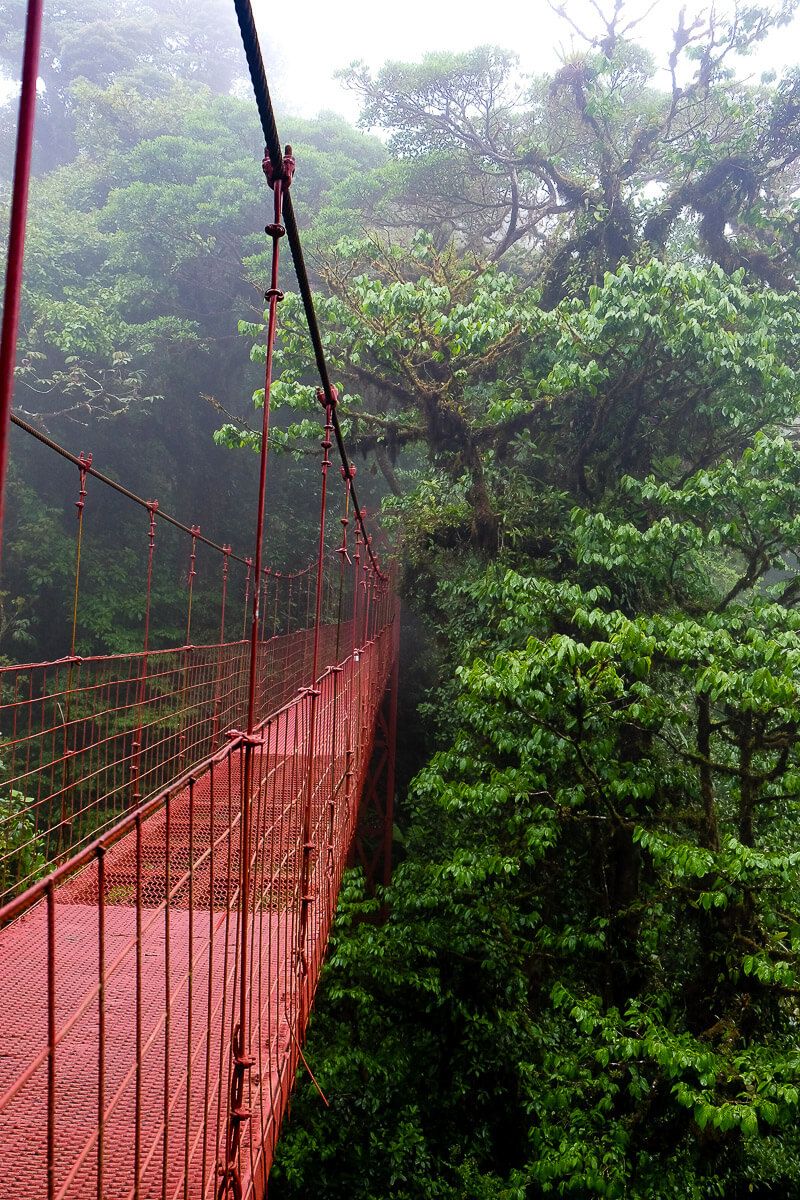
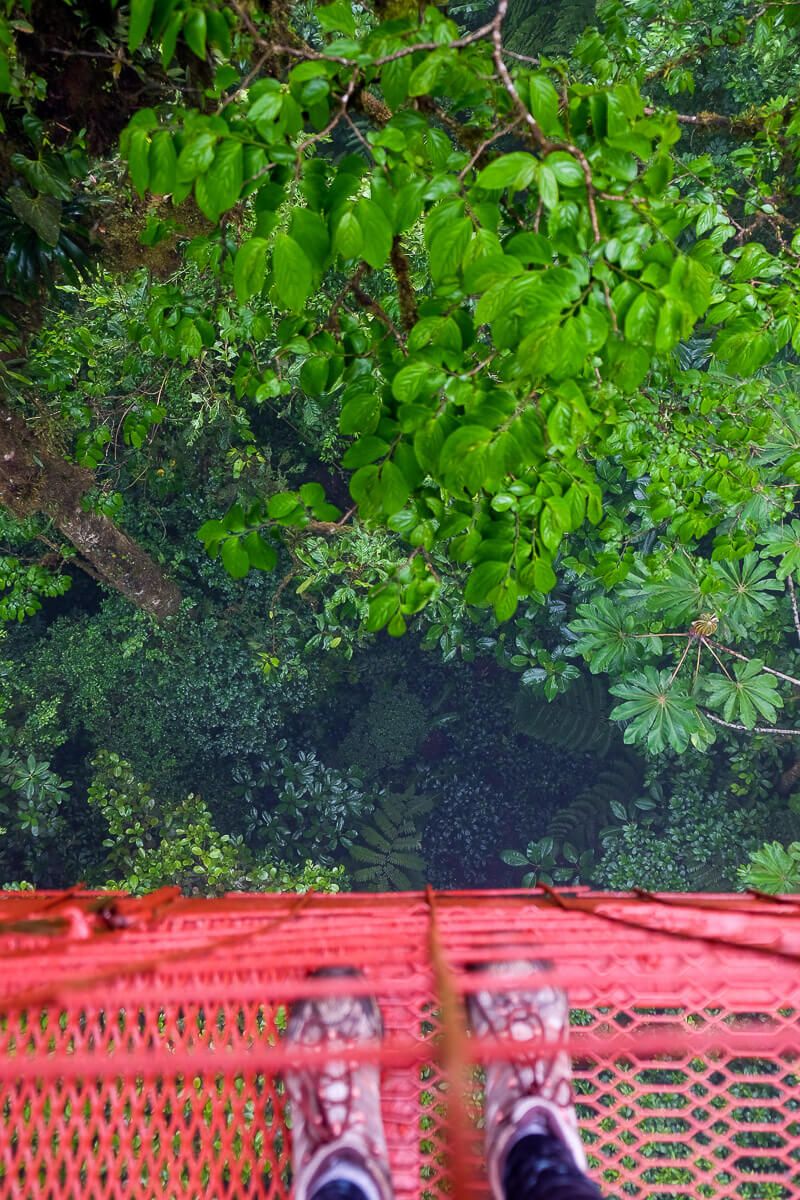
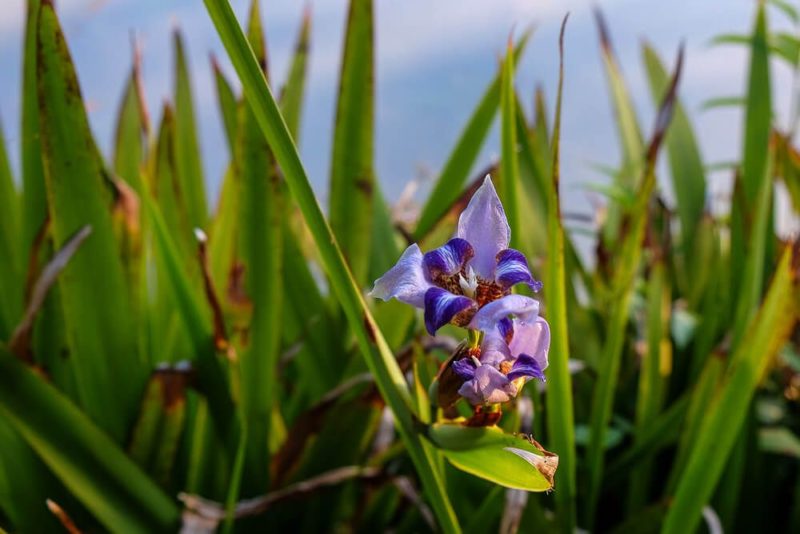
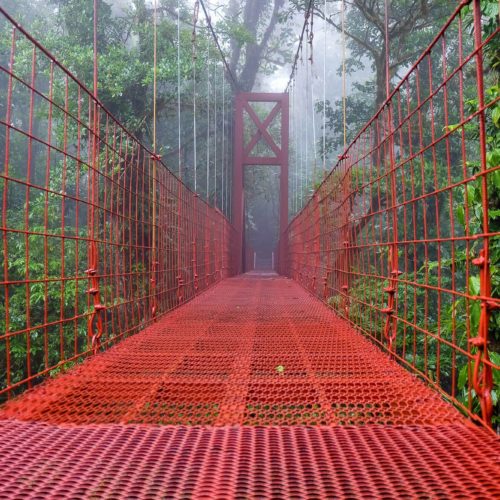
In the reserve itself, we saw lots of birds, a coati, and an agouti. It was also really quite cool to be inside a cloud forest. Up in the higher parts of the reserve, the forest literally dripped around us. And on top of the continental divide, we got to experience the power of the winds rushing up the hillside (though unfortunately our view was obscured by clouds…but it is a cloud forest).
And I did love the suspension bridge.
Read Next: A Self-Guided Hike in the Monteverde Cloud Forest

That night we relaxed and grabbed dinner before heading to bed early.
Oh and if you want to drink beer while you are out, Costa Rica has two main beers: Pilsen and Imperial. Both are light in color with the Imperial being a bit heavier. If you want to drink cheaply, these guys are the way to go!
Day 3: Time To Zip line & See Some Night Creatures
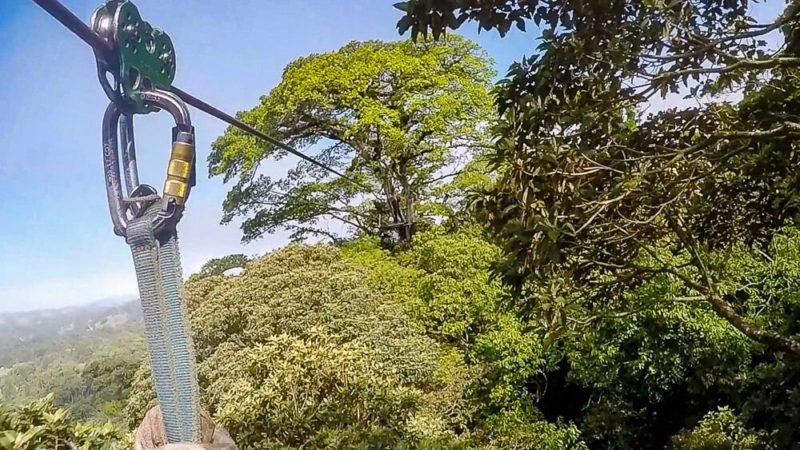
This was a busy day for us! And it started early with some zip lining at 7:30am.
We booked our zipline tour with the Original Canopy Tour. For $45/person it includes a Tarzan Swing, 14 platforms of zip lines, a rappel, and a tree climb. And although the Original Canopy Tour might not have the biggest or fastest zip lines, they were still amazingly fun (and at times – like the tree climb – slightly terrifying and thrilling). Plus I liked that everything was included in the price and not just tacked on at the end.
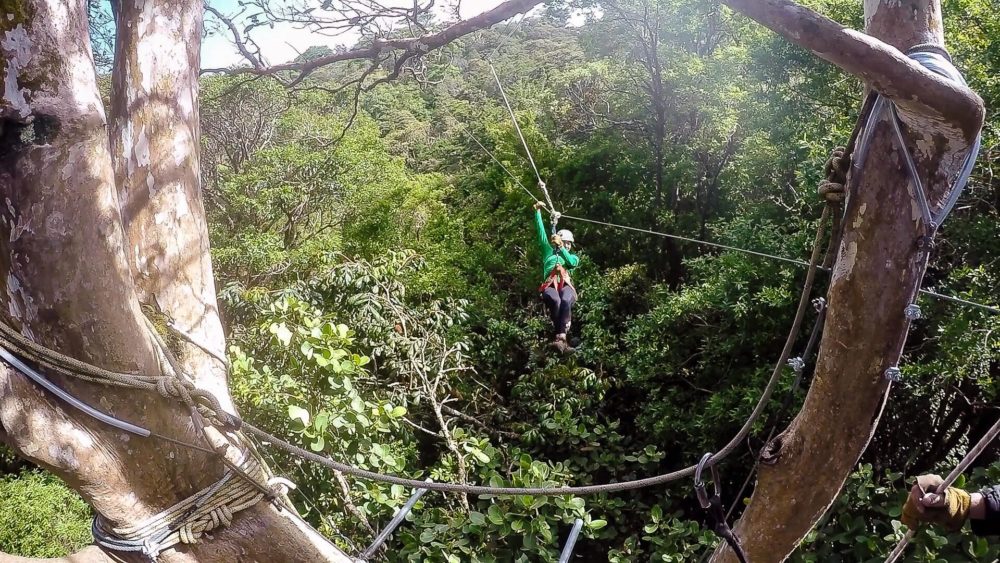
Our two zip line guides were fantastic. And we got to have basically a private zip line tour since no one else booked the 7:30am slot. It was just us and our guides. Which let us cruise through the platforms at a pace that suited us.
My main advice with the Original Canopy Tour? Book your zip line trip with your accommodation when you get to Santa Elena. Don’t try to do it beforehand. All the details in this full post plus a video!
Read Next: A Monteverde Zip Line Tour with Original Canopy Tour
Since our zip line tour was so early in the day, we were able to eat lunch, take a nap, and just relax until our night tour later that evening.
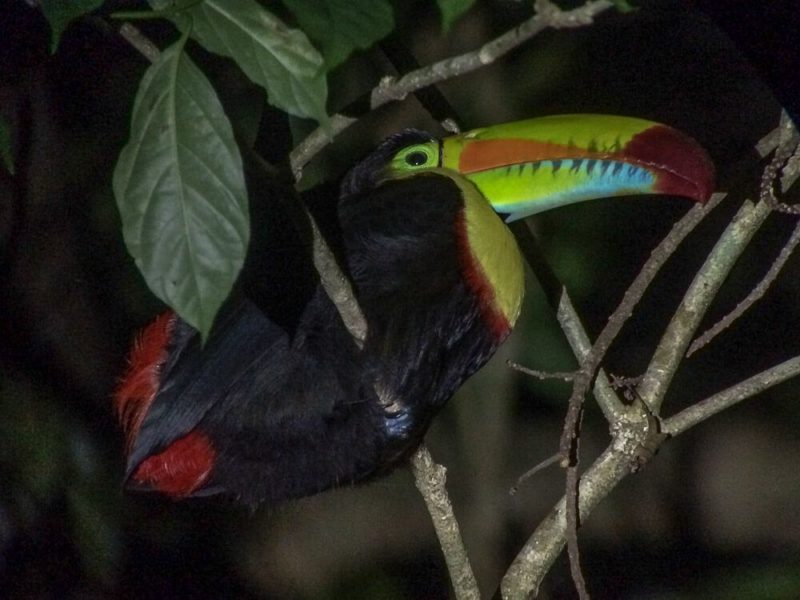
Our first wildlife tour of the trip was a night tour with Nasua Tours. And let me say right off the bat that Oscar was amazing. Sometimes you meet people who are so nice and gracious and passionate about what they do that it rubs off on you. That was Oscar. He loved his job and was happy to talk to us about anything and everything.
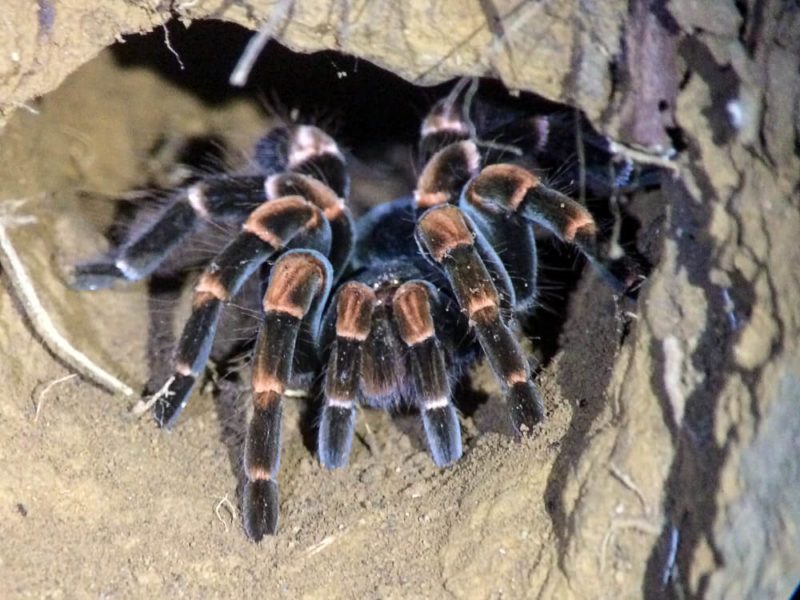
That night we went to the Monteverde Refuge with him and only 2 other people. We saw a tarantula, toucans, an olingo, a scorpion, lots of ants, vipers, and a kinkajou. And that was only our first experience with Oscar. In the morning we had one other tour booked.
Read Next: Want to See Wildlife in Monteverde? Nasua Tours Has You Covered.
Day 4: Another Wildlife Tour + Coffee
Our last full day in Monteverde began with another wildlife tour. This one was with Oscar again (because he is the best) and was at Curi-Cancha.
And other than spotting a sleeping olingo, this became an amazing bird watching tour. The morning began with spotting a toucanet right by the parking lot.
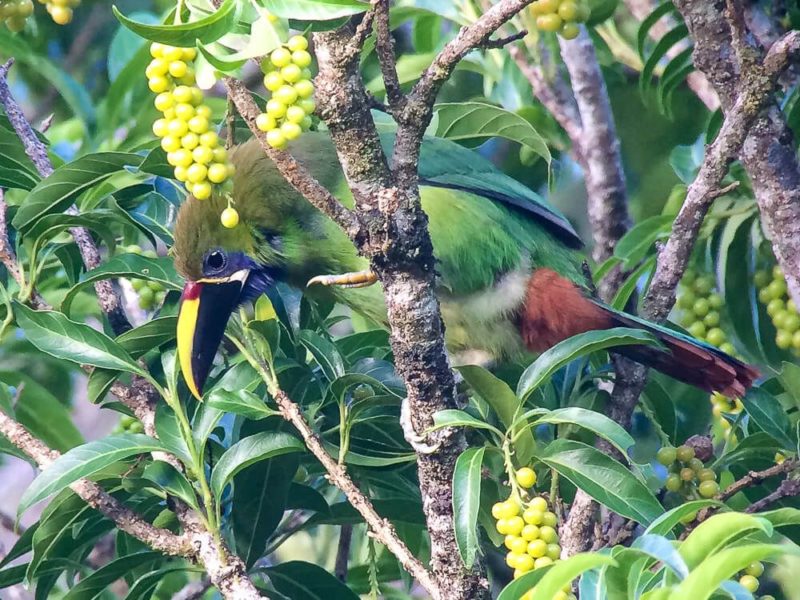
Later we would spot a larger toucan…and we would learn that the toucans are basically the jerks of the bird world. Actually jerks isn’t a strong enough word. Toucans are vicious. They eat other birds’ babies!
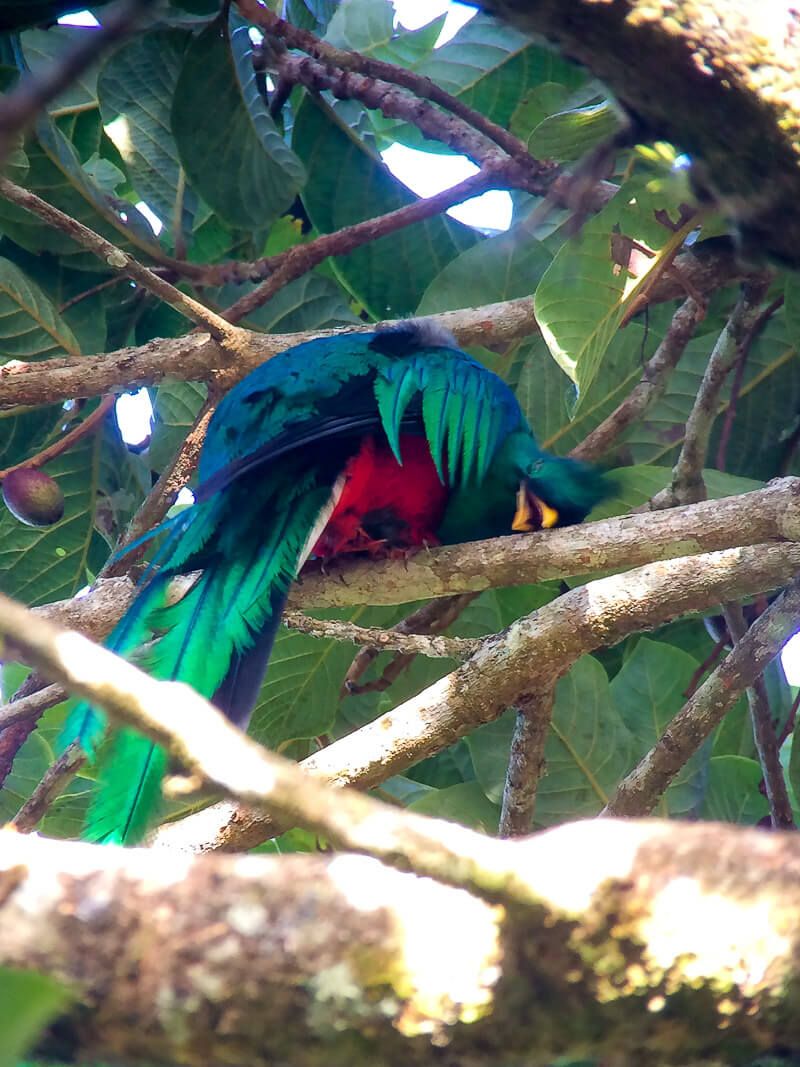
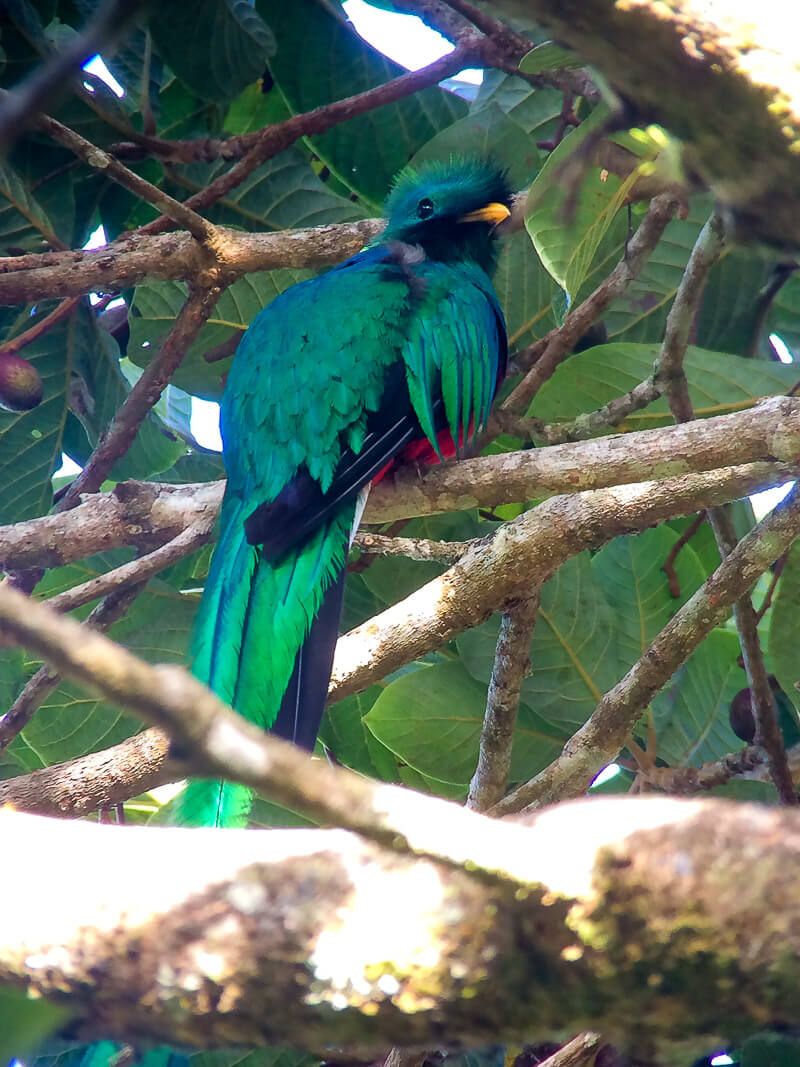
But soon we would leave the toucans behind and see the Costa Rican bird, the quetzal. This beautiful bird is only found in the mountainous regions of Central America (and mostly just Costa Rica at this point). Seeing this bird was the highlight of the morning.
Read Next: Want to See Wildlife in Monteverde? Nasua Tours Has You Covered.
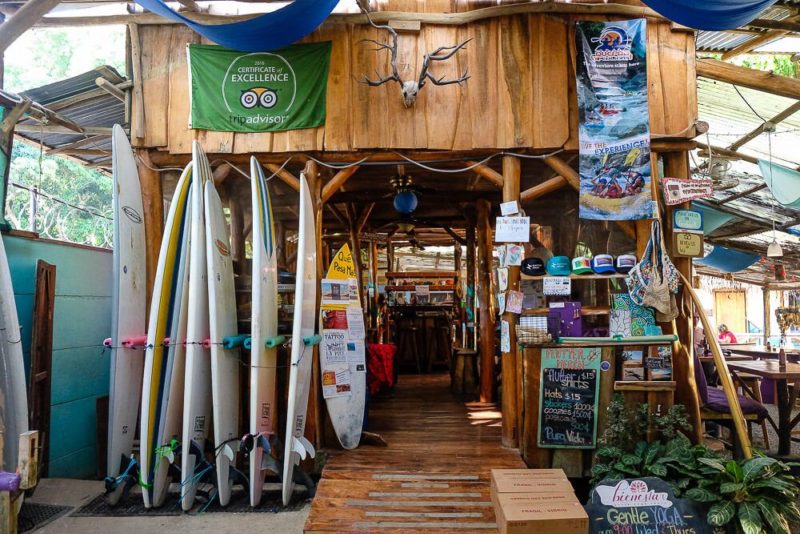
After our morning tour ended, we had the afternoon to ourselves. And I was ready to do some shopping. First item on my list? Coffee.
Our lodge recommended a local cafe in Santa Elena to pick up some coffee grounds and we stumbled upon a wonderful discovery: Cafe El Trapiche.
Walking into the cafe there were shelves of coffee to our right and one lone guy behind the counter. Immediately he struck up a conversation with us by asking what I was looking for. Then began an extremely detailed tasting process (all free). He heated, weighed, and made coffee in such an intricate manner I was astounded. All the while talking to us about the coffee and their farm.
I was again blown away by the passion he expressed for the coffee. He loved what he did and what he makes, and he was happy to share that with us.
I bought 3 bags of coffee in the end. And it was some of the best I’ve ever had.
Where To Eat In Monteverde
Breakfast
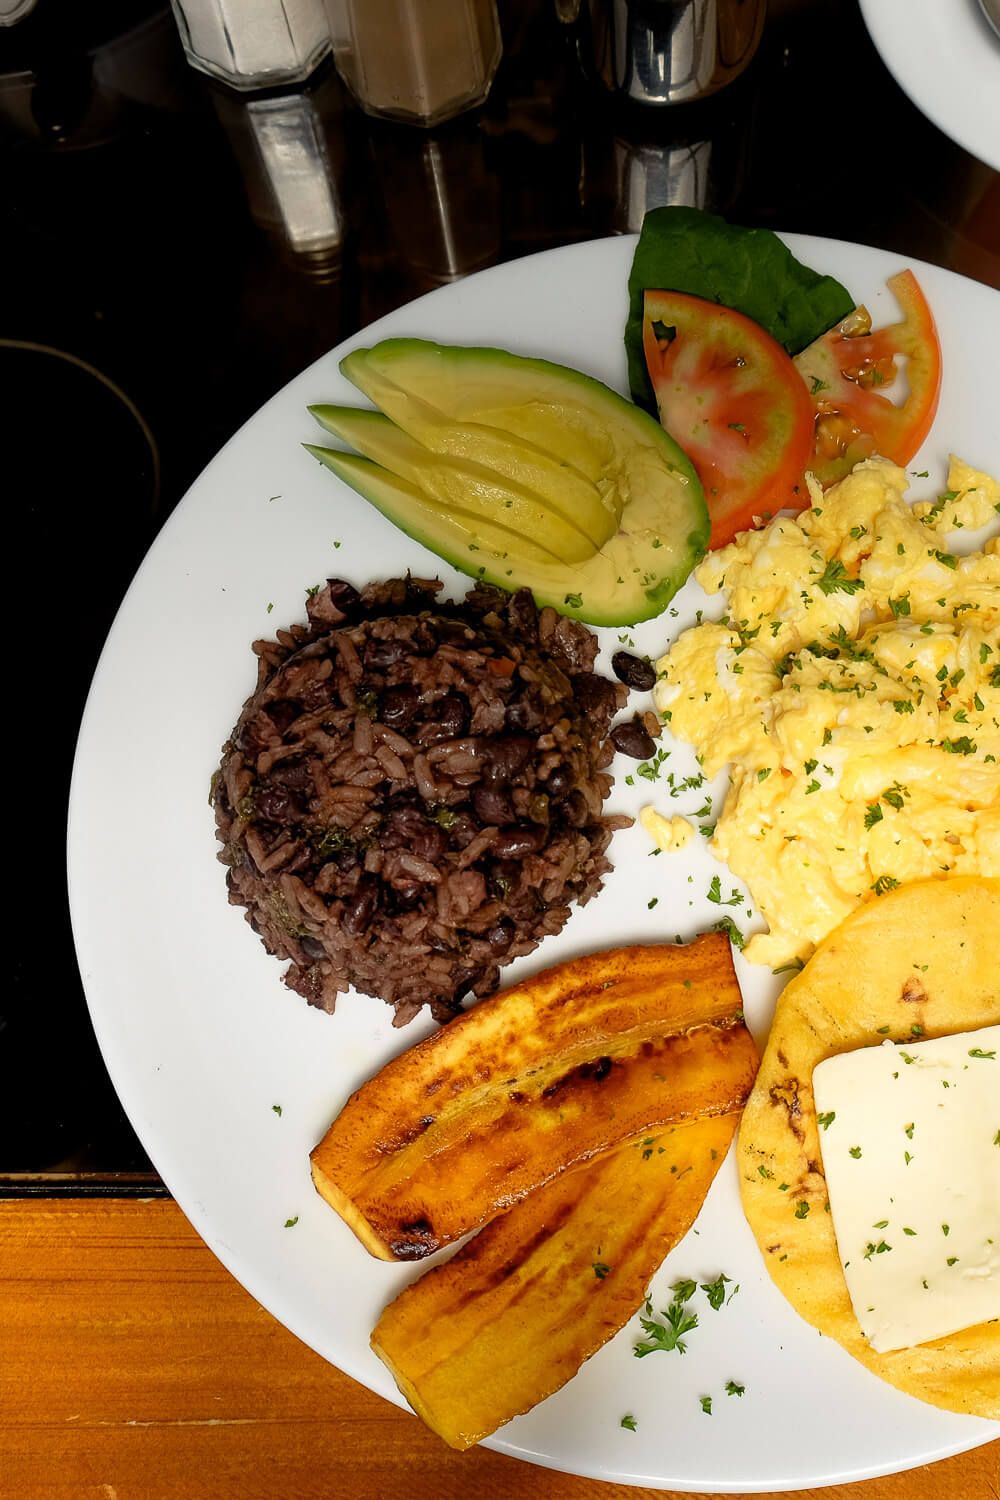
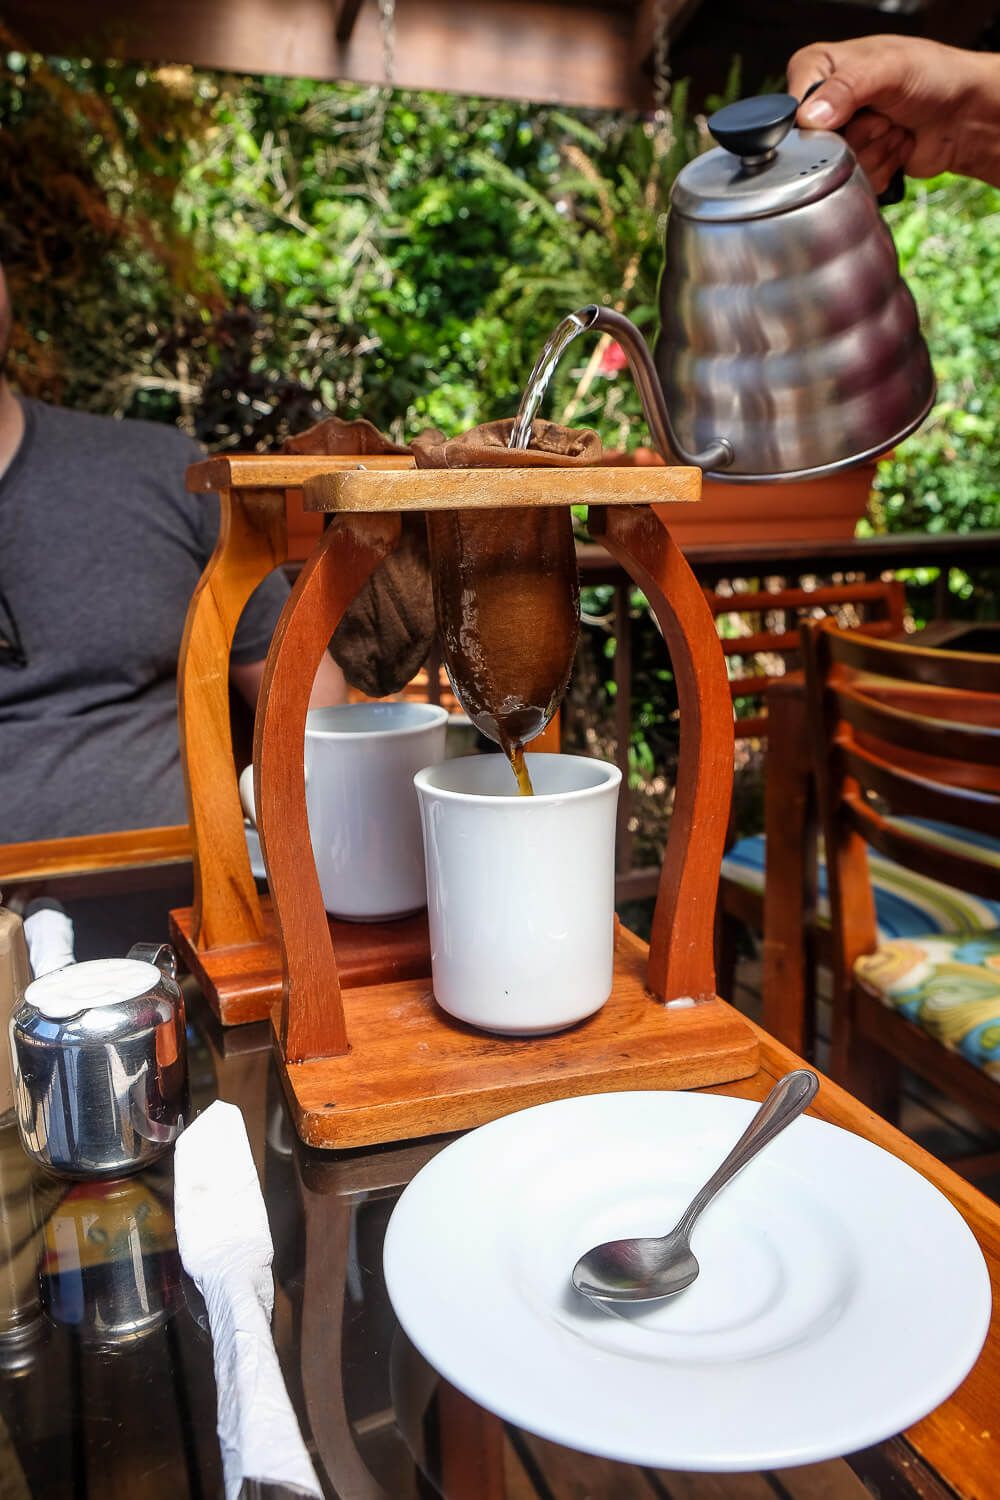
Orchid Cafe was right around the corner from our lodge. And the food was delicious. We were able to sit on the porch and relax. Plus we got this awesome Costa Rican coffee. It dripped down through the bag and was really cool. In terms of food, I went for the traditional breakfast which was simple and delicious.
Stella’s Bakery. We only had time to grab a smoothie and a couple of pastries on our way to Uvita. But the food was amazing, and I wish we could have had time to enjoy a real meal there.
Lunch
Taco Taco. Want a burrito? And/or a taco? This is a delicious, quick, and filling place to grab some food. I think its location in Santa Elena has moved since we’ve been, but it still looks to be right in the center of town. After a morning of zip lining, I needed a burrito.
Dinner
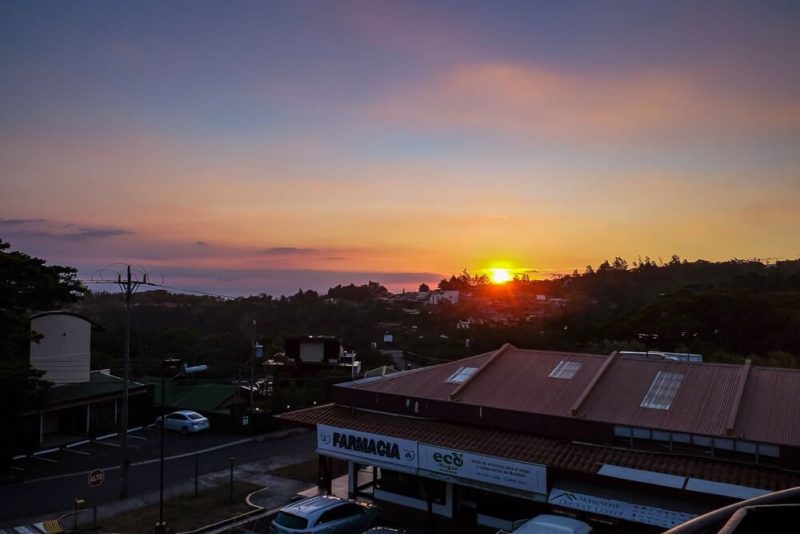
Sabor Tico. Located on the second floor of a shopping center, Sabor Tico is a very popular spot. Ryan and I grabbed a couple of seats on the balcony. The sunset was spectacular, but I wished I had worn something heavier for when the sun went down. I again went for something traditional: meat, plantains, fruit, and potatoes. Costa Rican food is very simple, but I found it to be delicious!
Monteverde Beer House was our first meal in Santa Elena. We drank some craft beers and ate some delicious Middle Eastern food. We just wanted something simple, good, and close. And not uber touristy. This fit the bill.
Drinks
Bar Amigos is a non-fancy bar. With lots of beer and seating. We went one evening just to have a couple of drinks and relax. Though it looks like it could get busy, this was perfect for our no-frills kind of mood.
Where To Stay In Monteverde
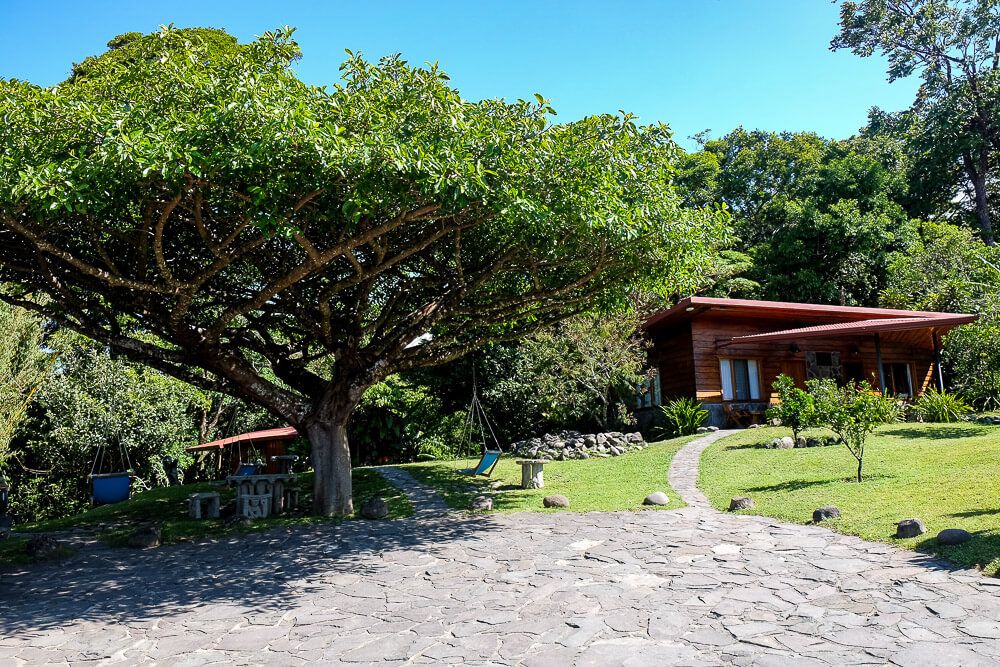
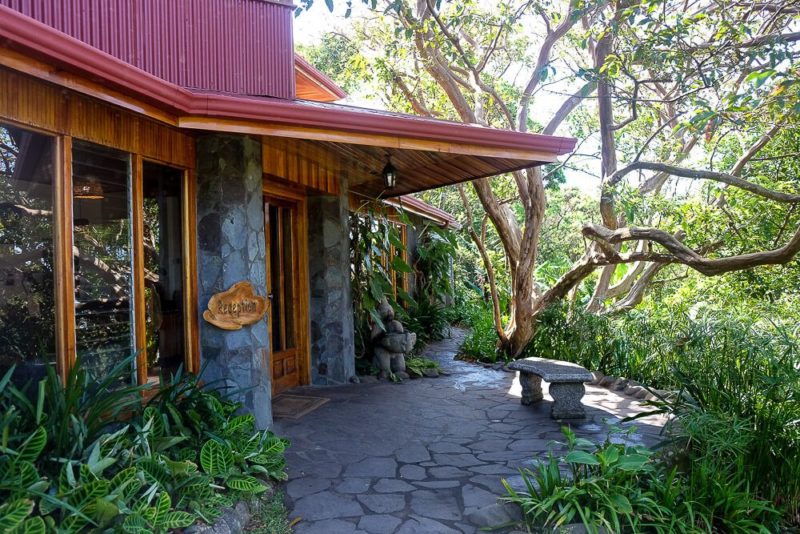
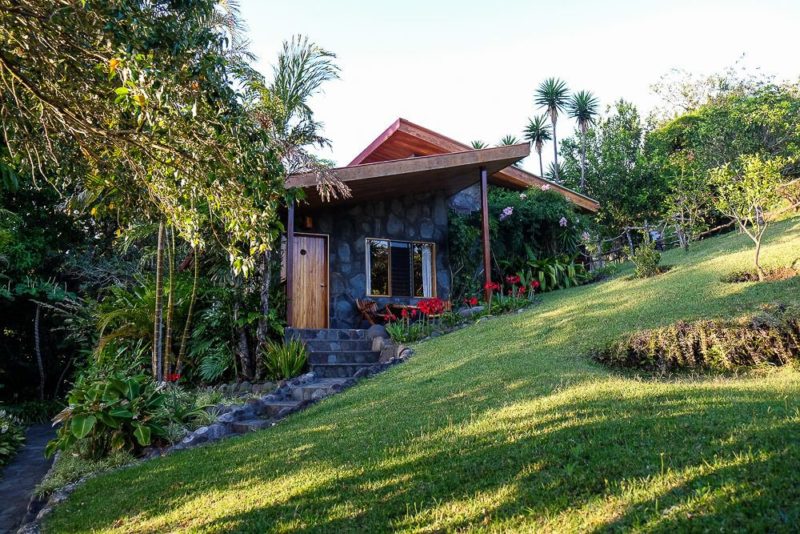
We picked Arco Iris Lodge. And I have to say I couldn’t have been happier with our choice. It was a bit expensive for us – definitely a splurge on the trip. But since we were booking late, we decided to go for it. And we loved it. The little cabins were adorable.
Our 4-night stay was broken into 2 cabins (a superior at $120/night and a standard at $91/night). We were only in the superior for 1 night (because the standard wasn’t available), but this would be perfect for a family or 2 couples. The standard size fit us wonderfully.
The staff also moved our luggage for us after the first night. So all we had to do was get the new key from reception and we were ready.
The staff was also incredible and very helpful whenever we had questions. And then there was the property itself. It’s located in Santa Elena (so walking distance to restaurants and shopping), but it feels miles away. The perfect oasis.
Arco Iris was definitely worth the splurge.
What To Pack For Monteverde
I didn’t do laundry on the trip. And since we were quite active, I sweated. And I started to smell. So I wore a lot of clothes. Plus it was a lot colder (especially at night) than I thought it would be. So I wore a lot of layers.
Here is everything I wore while I was in Monteverde (except for undergarments):
Shirts
- Long sleeve pullover (midweight). I get a lot of my half zips from TJ Maxx, but this is an equivalent of what I bought.
- Long sleeve pullover (lightweight). Same thing here.
- Long sleeve undershirt (lightweight). I also wore this in Uvita as a rashguard.
- Black tank top. I wore this as a kind of undershirt.
- Black t-shirt.
- Green t-shirt.
- Nice long sleeve shirt to wear out at night. I actually brought a tank top but hardly wore it since it was so much colder at night than I thought it would be. I wish I would have packed a nicer long sleeve shirt (or even sweater) to wear to dinner at night.
- Rain Jacket. I don’t actually own a rain jacket. So instead I packed the outside liner of my ski jacket and called it good enough. It definitely worked, though it did take up a bit more space. You will wear this at night as well.
Pants
- Long leggings. I can’t find the ones I bought and packed, but this is a pair I own and almost brought with me. Old Navy has some great cheap leggings.
- ⅞ leggings. I love the PopFlex leggings. The ones I packed were the wishing star capris.
- Capri leggings. I wore these during the warm afternoons. Got mine from TJ Maxx, but these look similar.
- 1 pair of jeans. I wore these out at night in Santa Elena the most. As well as on the airplane.
Footwear
- Hiking Socks. To go with my boots.
- Hiking Boots. If you don’t go hiking in a cloud forest, you don’t need hiking boots. And as long as you are okay with your shoes getting a bit wet/muddy, you may still not need hiking boots. I packed mine and wore them everywhere in Santa Elena. The only other shoes I packed were sandals for Uvita.
Other Things
- Lightweight scarf at night. Yes I do get cold a lot.
- Travel Febreze. Sometimes my clothes needed a little bit of a spritz.
- Travel (compact) Binoculars. To spot some birds/animals if you care about that sort of thing. I bought a pair and they worked great for what I needed (i.e. small, light travel binoculars).
- Camera bag with a rain cover. If you have some nice photography equipment, consider a bag with it’s own rain cover. My PacSafe bag has one built in. This allowed me to easily snap it on when the mist got a bit too much in the cloud forest.
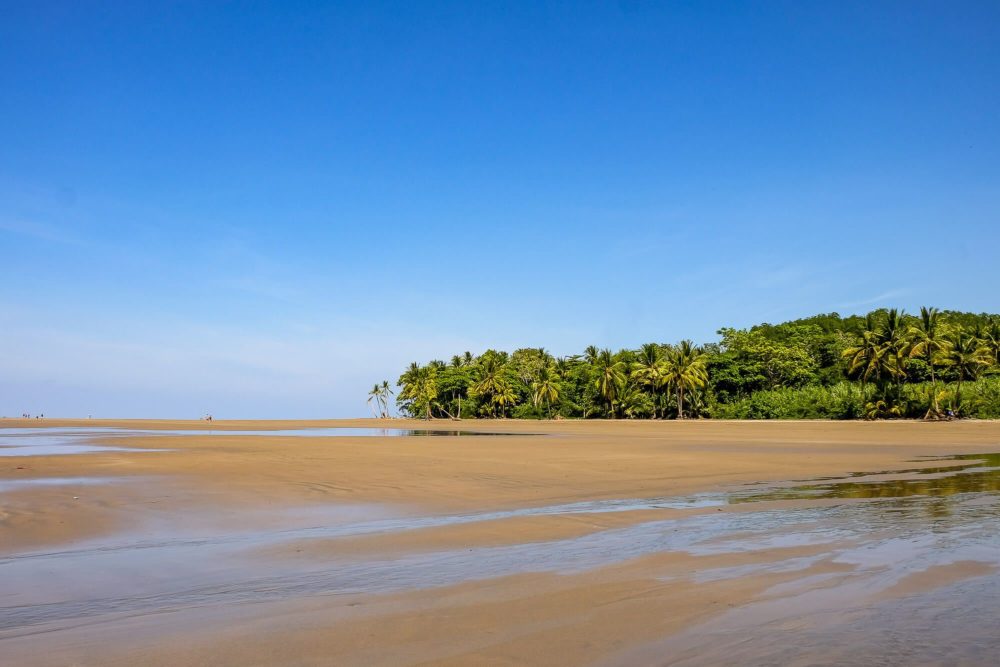
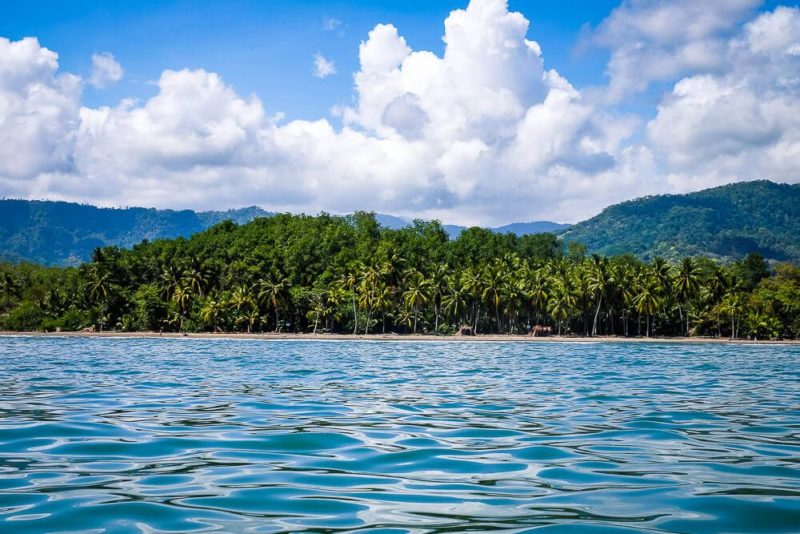
Days 5 – 8: Uvita
Day 5: Drive Down To Uvita
This is a bit of a long drive. And we left in the morning (after I decided to go back and buy a quetzal painting I had been eyeing). The drive can take about 5 hours. And remember…the first 18 or so miles out of Monteverde is on a dirt/gravel road. Though at least this time we were driving it during the day.
And the views were glorious.
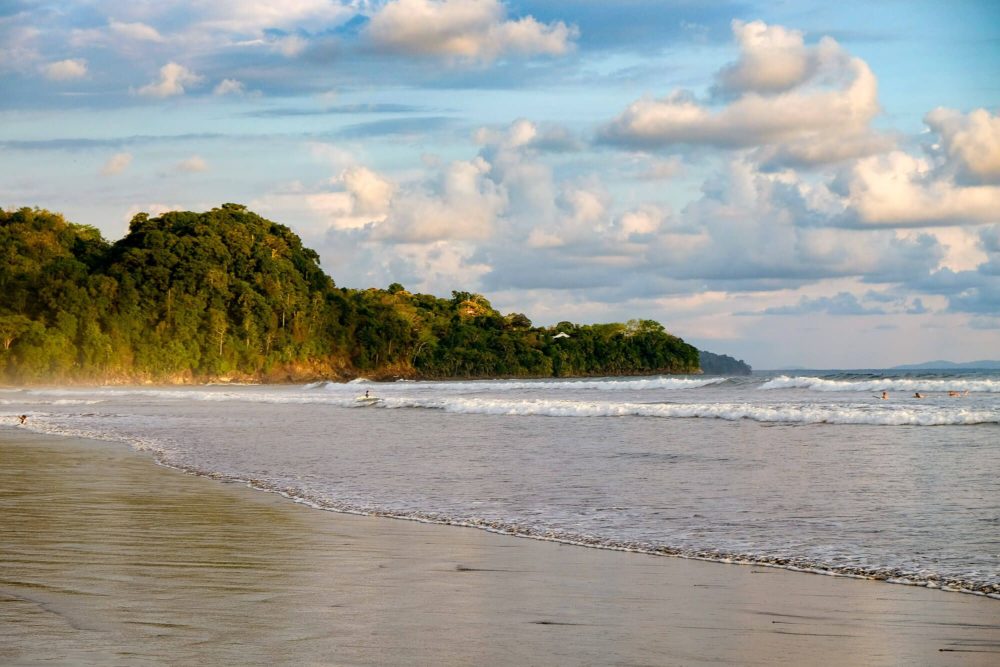
By the time we arrived in Uvita, it was getting onto sunset. And our first order of business was checking into our hostel and ordering a beer.
Quick side note, I loved the hostel we stayed at in Uvita. I was a little worried I had outgrown hostels, but this proved I didn’t. It was everything I could have wanted.

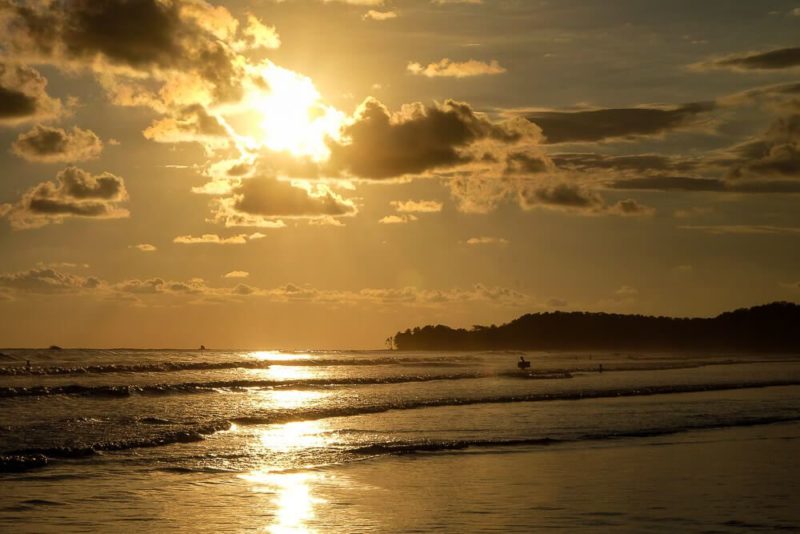
Then after everything was squared away, we walked to the beach (just 5-10 minutes away) to catch the sunset.
I don’t have a picture of this first sunset since we had been heavily warned about bringing valuables to the beach. But it was the best. Reds, golds, and purples lit up the sky. And the jungle behind us still seemed to be glistening (steaming?) from a recent rain.
It was breathtaking.
Read Next: Exploring Uvita: 5 Awesome Things To Do In Uvita
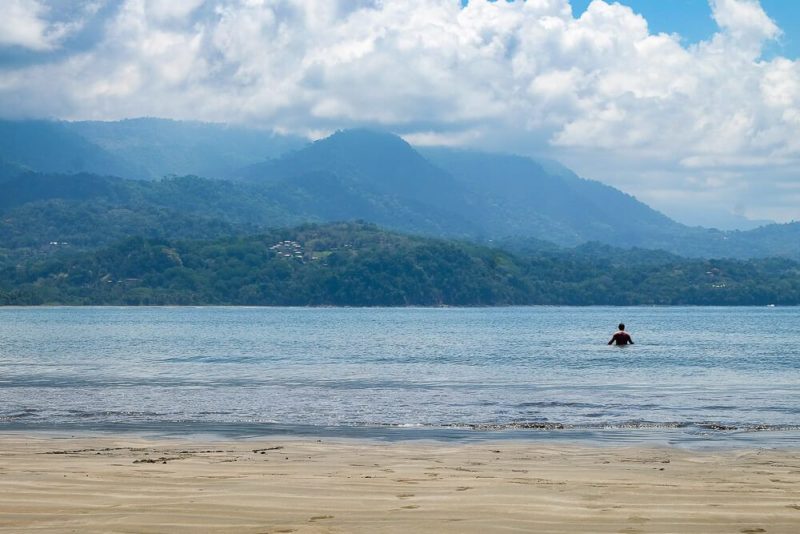
Day 6: It’s Snorkel Time
The number one thing I wanted to do in Uvita was snorkel. And snorkeling in Uvita means Cano Island. And even though the trip was quite expensive ($120/person), it was still one of the best decisions we made.
We booked our snorkel trip through Mad About Diving. They boat you to and from the island, guide you through two dives, and provide snacks on the way back. They also specialize in scuba diving out at Cano, but do snorkeling as well.
And our group was small (4 snorkelers including us and 3 divers). And I loved that. I feel like I got to know the other people in our small tour.
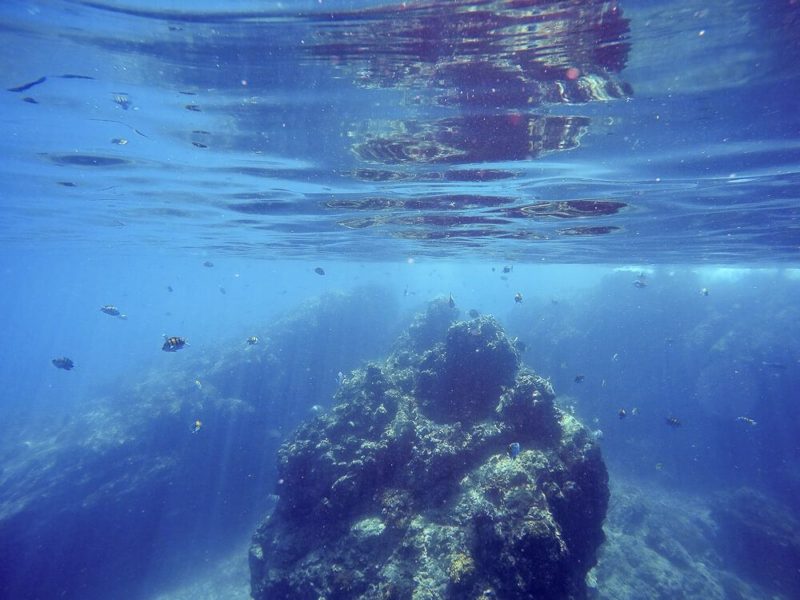
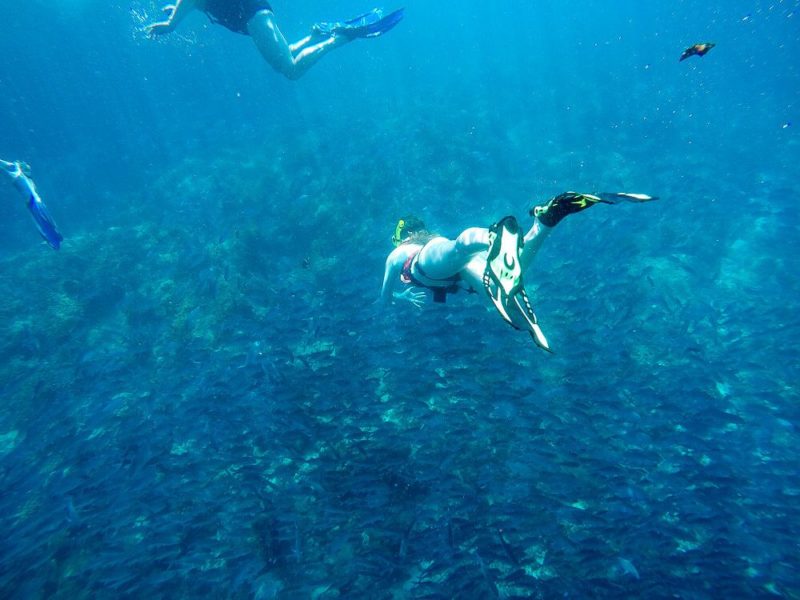
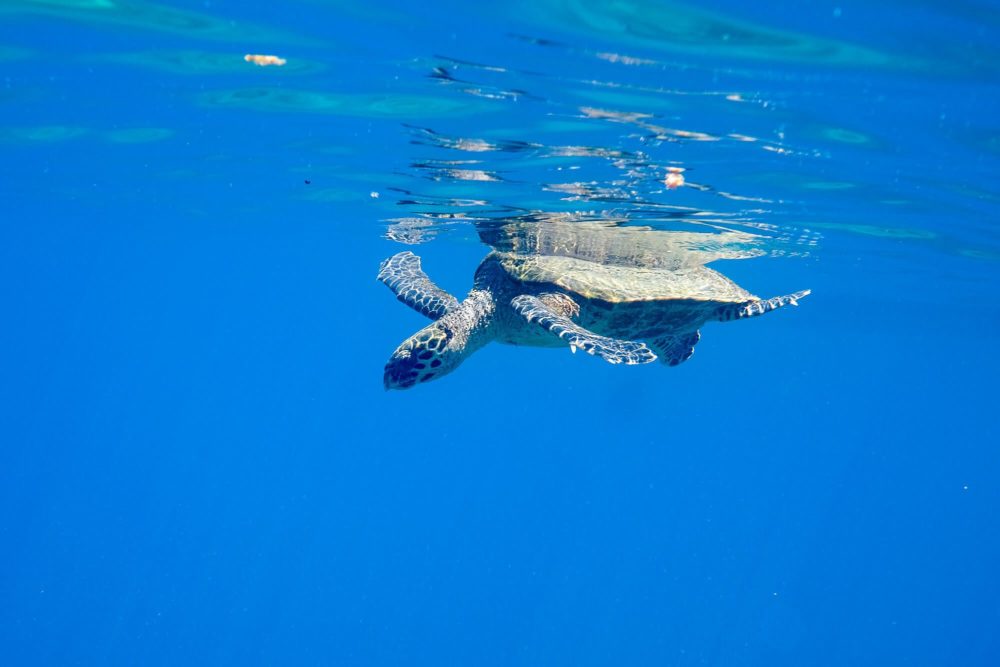
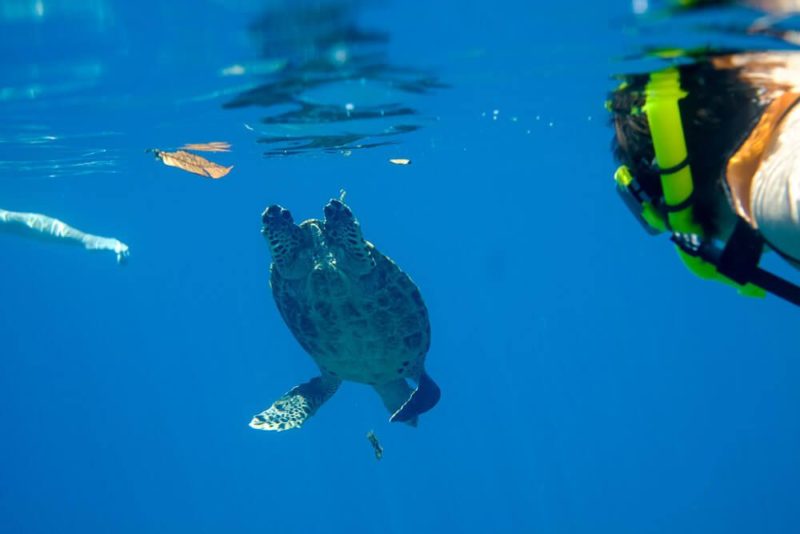
So…did we see anything. Oh hell yea. The water that day was crystal clear. We saw so many fish. Colorful ones. Puffer. Parrott. And schools of fish (both big and small). We also spotted sharks, dolphins (during the boat ride), sting rays, and one glorious turtle.
Read Next: Finding My Sea Turtle: Snorkeling at Cano Island
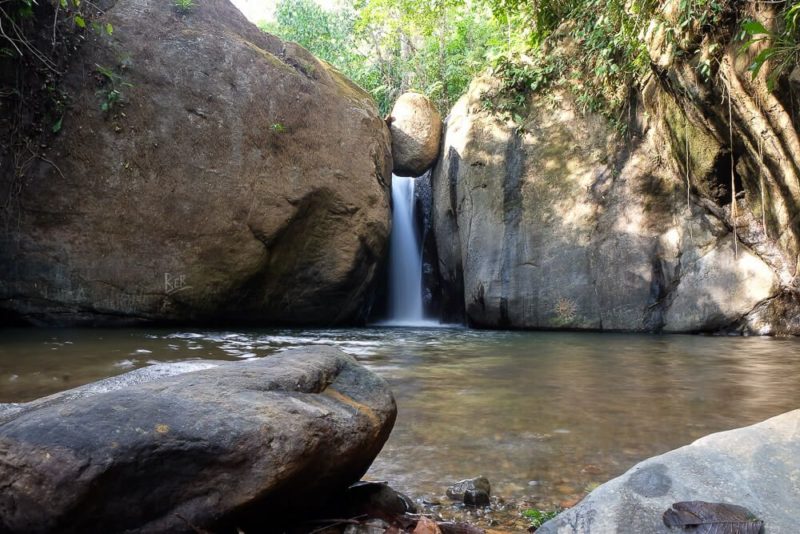
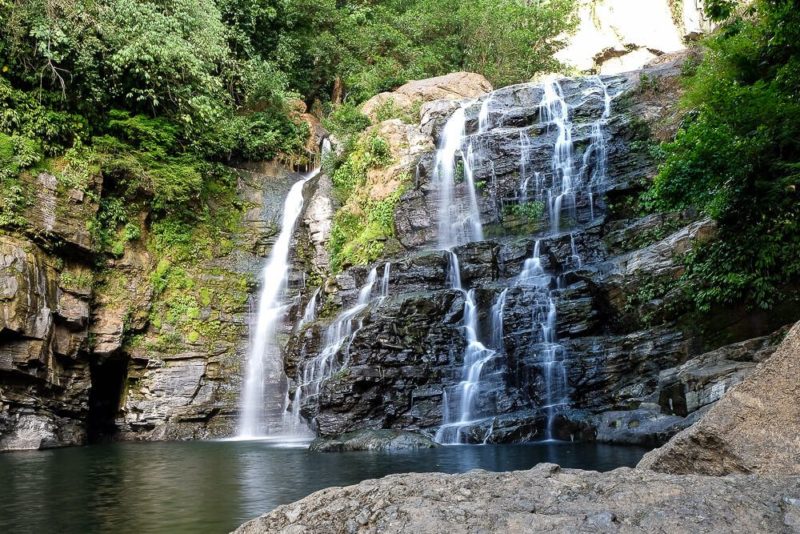
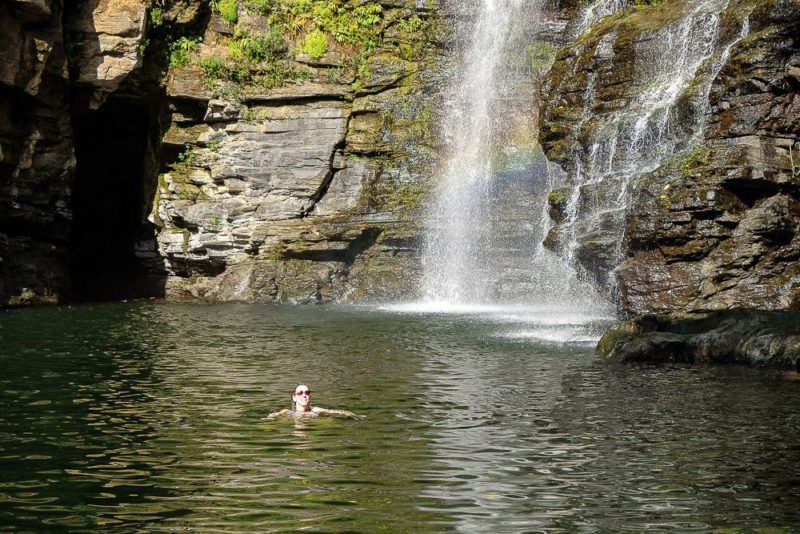
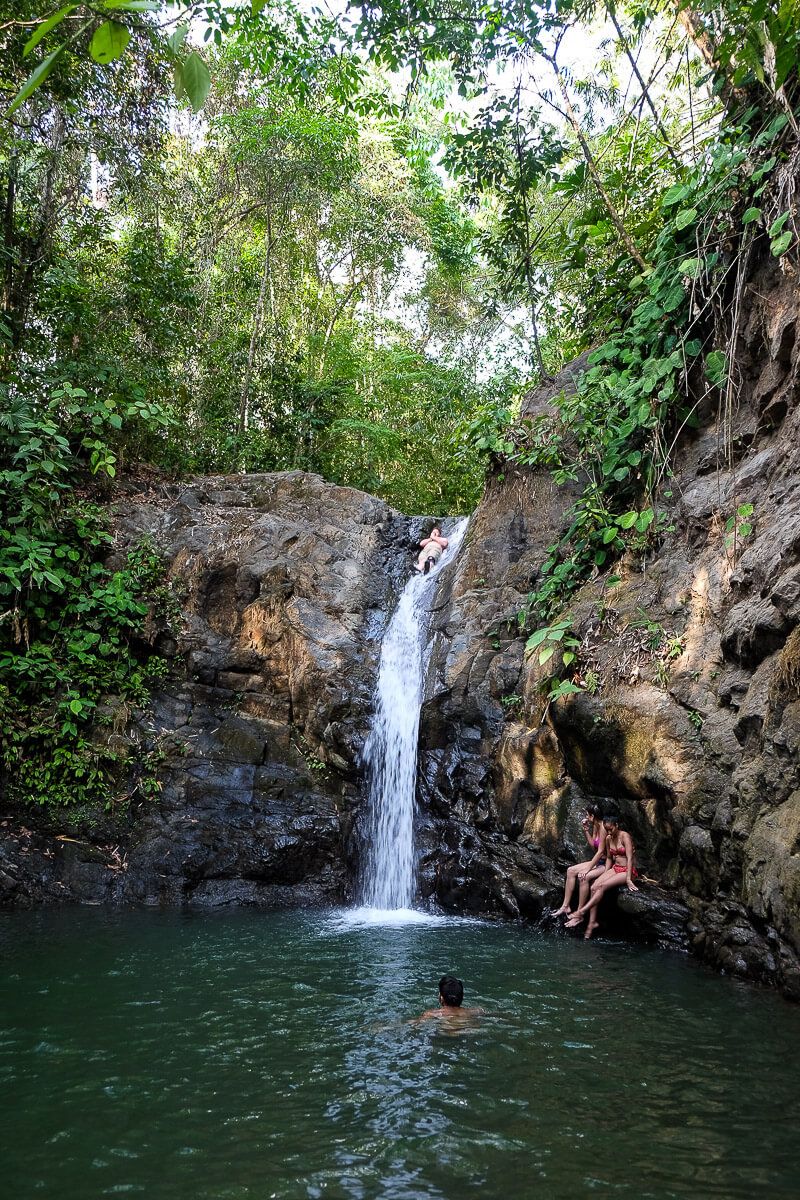
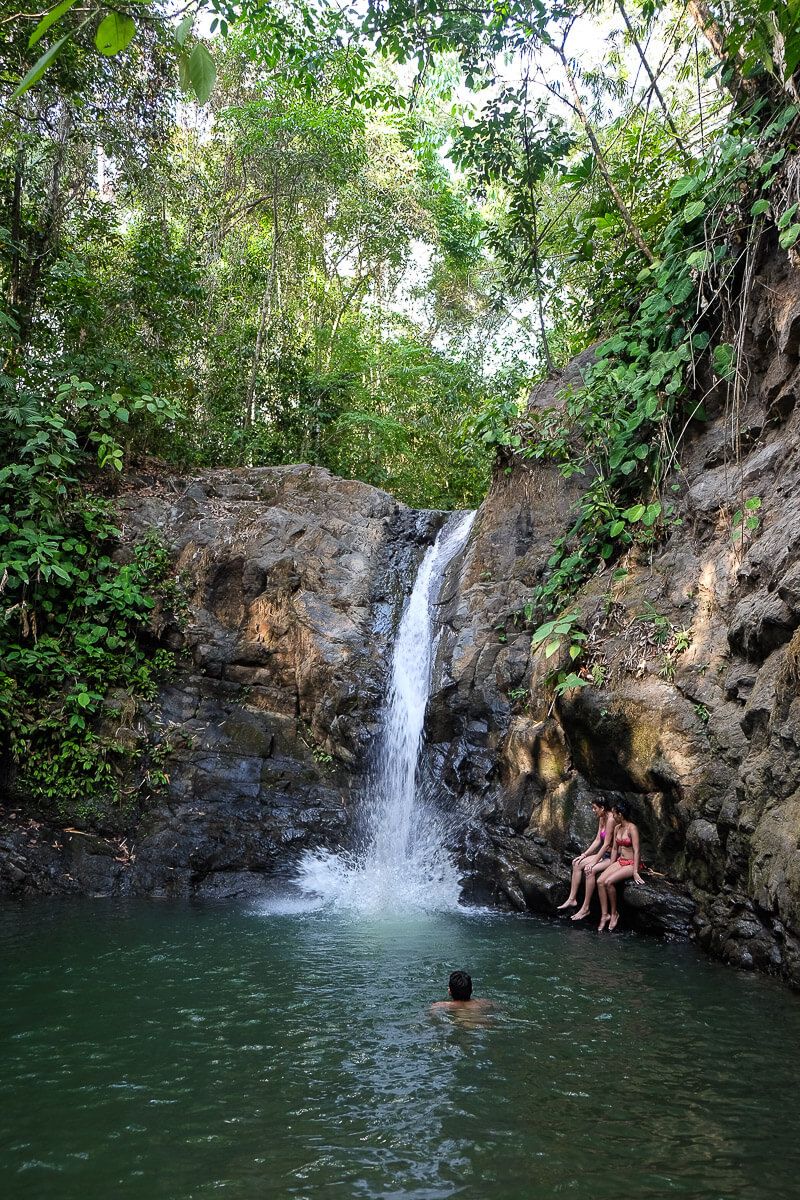
The only bad thing about our trip was that I got horribly sunburned. So that afternoon we needed to cool off. And cooling off in Uvita means a waterfall.
Our first waterfall was Cascada El Pavon. This is a smaller waterfall and is located a bit south of Uvita. You’ll definitely need a car since once you pull off thea highway, it’s still a 10-15 minute drive down a dirt road to the waterfall.
The main feature of the waterfall is that a giant rock rests right above the falls. And though it was bigger than I realized, it’s still on the small side. But that day we wanted something peaceful after our morning snorkeling. And Pavon provided that.
Read Next: A Tale of 3 Waterfalls in Uvita
Day 7: Whale’s Tail
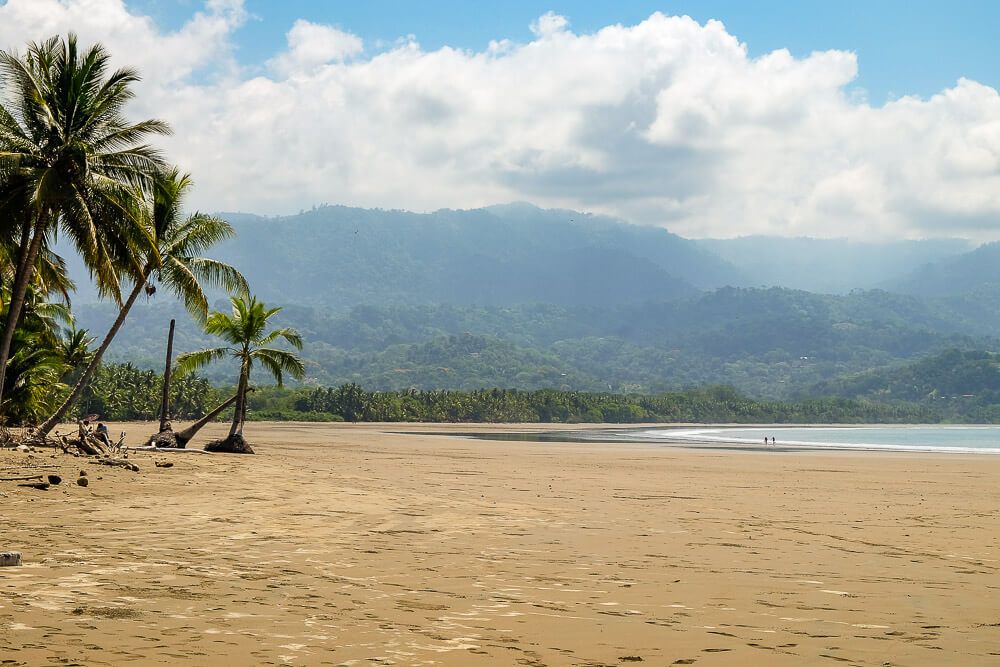
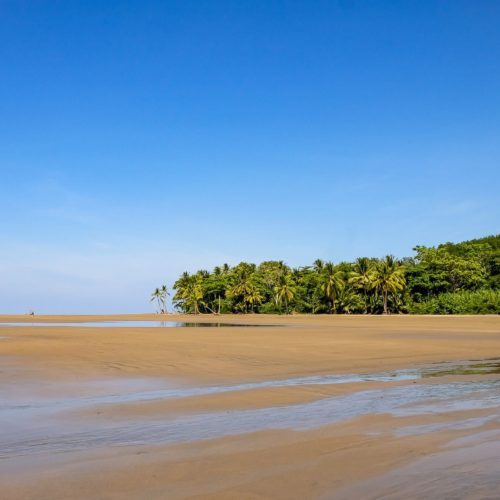
This morning I wanted to experience the main attraction in Uvita. The whale’s tail.
Yep, the main point/sandbar in Uvita is actually the same shape as a whale’s tail. And it’s only walkable at low tide. Oh and it’s a kilometer long. And did I mention that you can actually spot whale’s off the end of it during certain times of the year.
Just think about that.
So this morning we walked from the hostel to the tail. It took us about 45 minutes or so. And I would definitely recommend doing this in the morning since it was so hot. SO. HOT.
Maybe it was because we got badly sunburned the day before. But regardless, we didn’t spend too much time out at the tail. But I’m still glad I walked the whale’s tail.
Read Next: Exploring Uvita: 5 Awesome Things To Do In Uvita
That afternoon I dragged Ryan to go see another waterfall. This time Nauyaca Falls.
Okay, long story short – though this waterfall was beautiful, I don’t know if it was worth it. The hike there was brutal (4km each way in intense heat). And if you do want to see these falls, for gods sake, please go in the morning. Do not do what we did.
So if you want to see Nauyaca, I would either give up snorkeling, the whale’s tail, or surfing, and do this hike first thing in the morning.
Want to know more about Nauyaca, check out my info on it in this post.
Read Next: A Tale of 3 Waterfalls in Uvita
Day 8: Surfing & More Waterfalls
This was our last full day in Uvita. And we purposefully left it open. And that morning I knew what I wanted to do.
I wanted to surf.
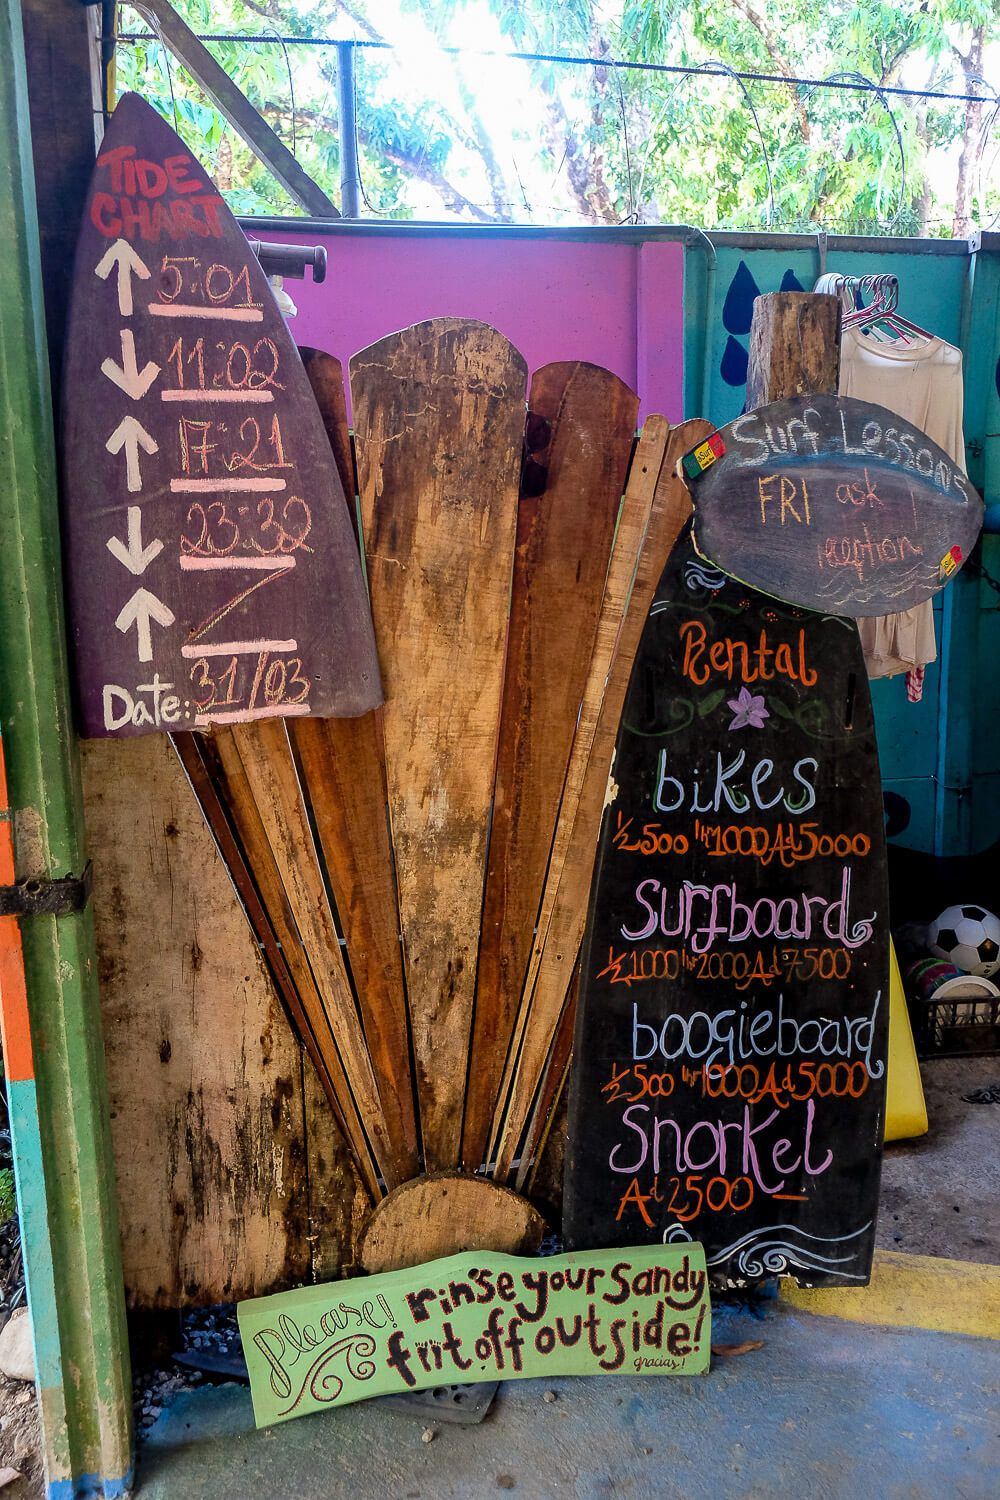
Luckily the Flutterby House arranges surf lessons and rents out boards too. Now even though I’ve gone surfing before, Ryan and I still signed up for a lesson ($50/person).
Jonah, our guide, then met us at the hostel and we literally walked to the beach.
That morning there were only 3 of us in the lesson. Jonah started us out on the sand and then put us in the water. I loved that he was there to help with tips and suggestions, but also let us practice on our own while he was with another person.
It was a laid back approach I really enjoyed.
Read Next: Exploring Uvita: 5 Awesome Things To Do In Uvita
After our surfing lesson, Ryan and I headed to the last waterfall on our list. This time it was Uvita’s own waterfall.
This is also a small waterfall. And it can be a bit crowded. But it’s got a big thing going for it.
You can slide down the waterfall.
And I was terrified to do it. But I did it anyway. Was it a bit scary? Yes. But also thrilling. And amazing. See a short video here!
Read Next: A Tale of 3 Waterfalls in Uvita
This was our last night in Uvita. And so we headed to the beach. If you haven’t gone to the beach at sunset for the nightly show, make sure you don’t miss it on your last evening!
Truthfully, we went to watch the sunset almost every evening. And on this day, the last one, it was particularly beautiful. The sun dipped down right behind the whale’s tail and disappeared behind a palm tree.
Magical.
Now I don’t have a photo of this last sunset. We only took our cameras to the beach once, and that was only for a few minutes when it was still fairly early. And we left before it even got a little dark. Why? Well because people get their stuff stolen around sunset pretty frequently, so we weren’t taking any chances. Now you should definitely still go watch the sunset. But just be very careful with your valuables.

Where To Eat In Uvita
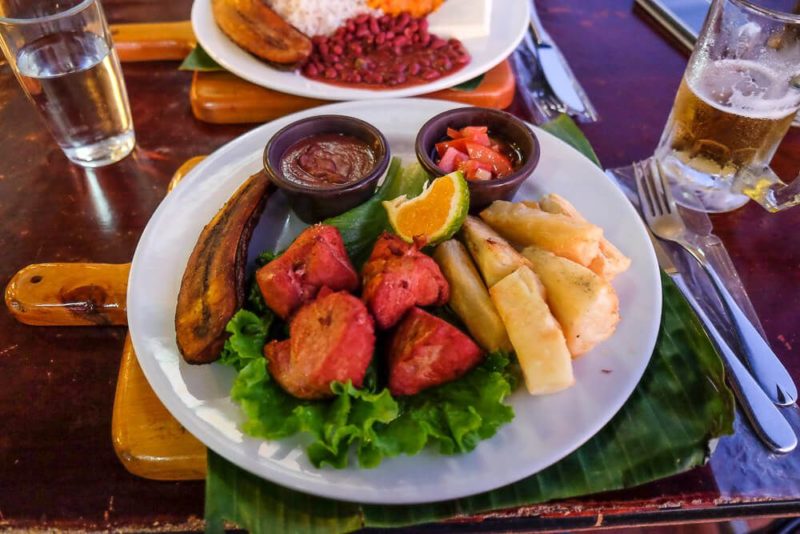
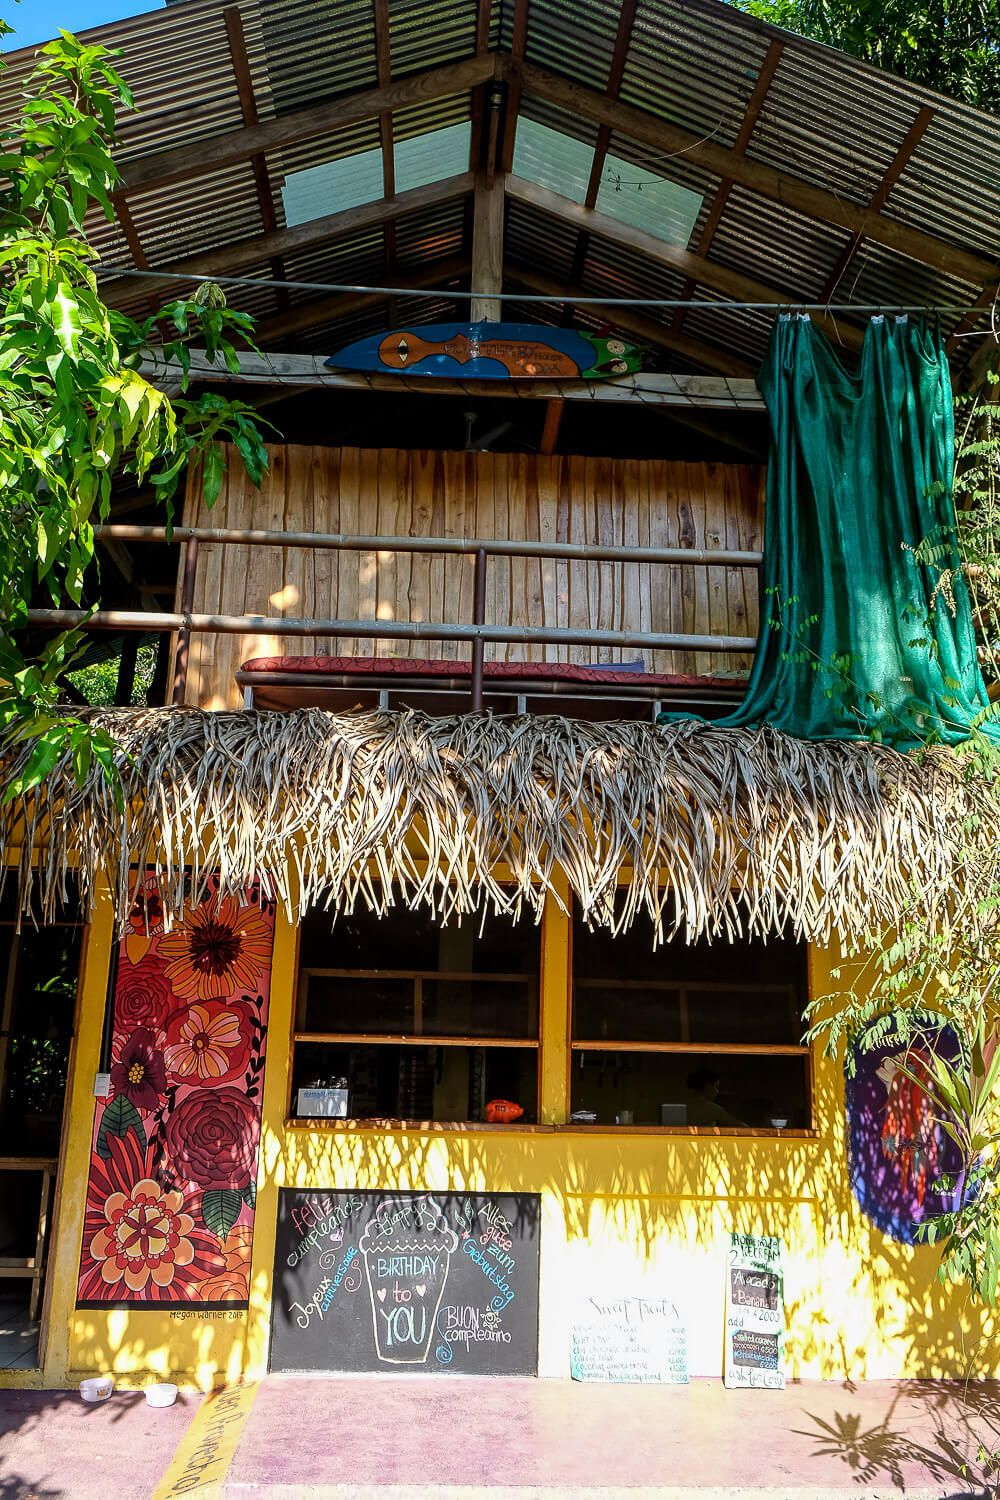
The Flutterby House. It is true that we ate all but one meal here. The food was that good and I loved it. We would start the morning with a shake and one breakfast meal. (The breakfast burrito was my personal favorite.) Then we’d grab a snack later in the day and dinner that night. Some dinners I liked more than others, but they were all delicious and reasonably priced.
Plus they have a great selection of craft beers. Oh and a happy hour jungle juice that is a great bargain if you aren’t a beer drinker.
Can you tell we loved it?
Sabor Espanol. This was the only other place we ate during our time in Uvita. And it was wonderful. This spanish themed restaurant gets busy for dinner. But expect the food here to take some time. Especially the paella. And it’s not cheap. But worth it if you are ready to go a bit fancy.
Where To Stay In Uvita
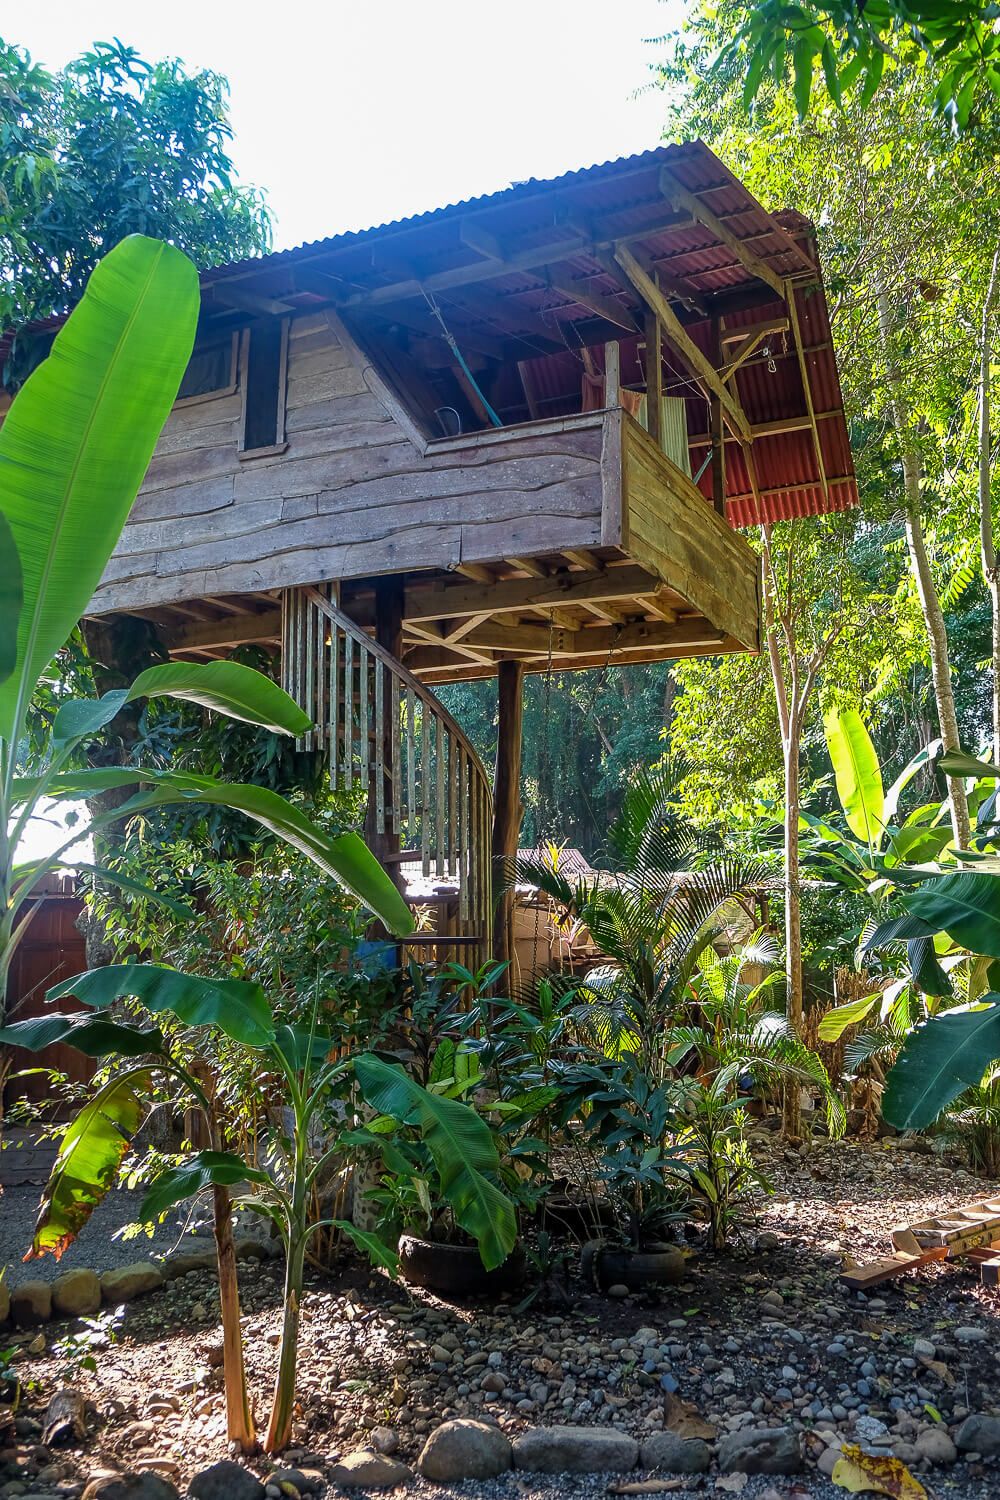
The Flutteryby House. Hands down one of the best places (let alone hostels) I’ve ever stayed at. The food, treehouses, cabins, staff, and just general vibe was amazing. I loved the people. I loved feeling like I was living in the jungle. I loved the 5 minute walk to the beach.
Obviously I just loved it. Read my full review to find out why.
Read Next: The Uvita Hostel You Need To Try: The Flutterby House

What To Pack For Uvita
I wore so much less clothes in Uvita. I still changed my shirt everyday, but these were tank tops. (I’m not a dress kind of girl.) And I wore my swimsuit probably almost everyday too.
Swimsuits
- 1 Swimsuit Top. I re-wore this top almost everyday.
- 3 Swimsuit Bottoms. But I switched out my bottoms.
- Sarong. This came in handy as a coverup as well as an extra towel.
Shirts
- 4 Casual Tank Tops. I wanted something loose fitting and casual to wear during the day.
- 1 Nice Tank Top. I wore this to dinner at Sabor Espanol.
- Rashguard. Handy for snorkeling and surfing.
Shorts
- Boardshorts. I wore these almost everyday.
- 1 Pair Of Jeans Shorts. I put these on at night for dinner so my boardshorts could dry.Footwear
- Rainbows. These are my go-to sandals.
- Keens. I liked having these while I was playing around in the waterfall. Something that would stay on my feet (and protect them).
Other Things
- Water Bottle. With all the snorkeling and playing in the waterfalls, you’re going to get thirsty out there. Make sure you take a reusable water bottle with you.
- Sunscreen. This is going to be really needed if you are out in the sun (think snorkeling & beach). And if you burn easily, bring some aloe with you. Trust me. Sunscreen and aloe is very expensive to buy in Uvita.
- Dry Bag. This gave us extra piece of mind when we had our cameras around water (like on the snorkeling boat).
- Towel. I bought this quick drying towel for this trip and I love it. Drys so fast and I used it both as a bath towel and a beach towel.
- Go-Pro. For snorkeling our Go-Pro photos turned out the best. And allowed us to get a video of our sea turtle.
Day 9-10: Head Back to San Jose
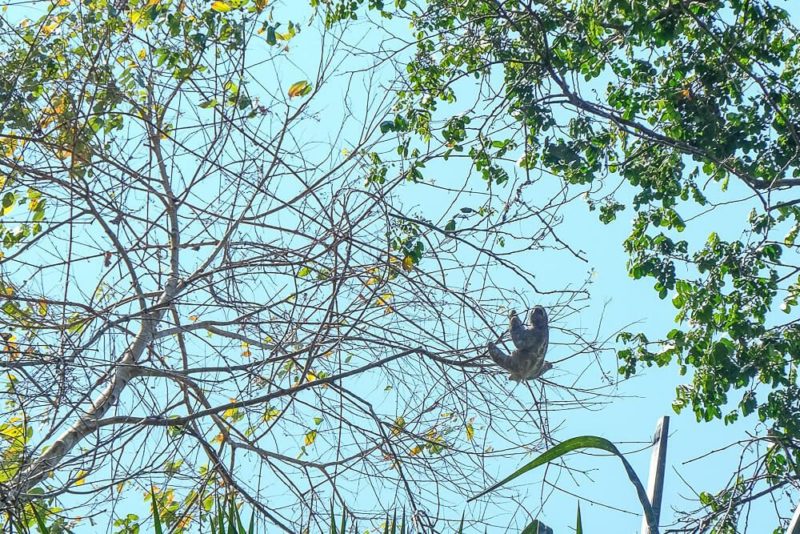
Day 9: Have You Seen A Sloth Yet?
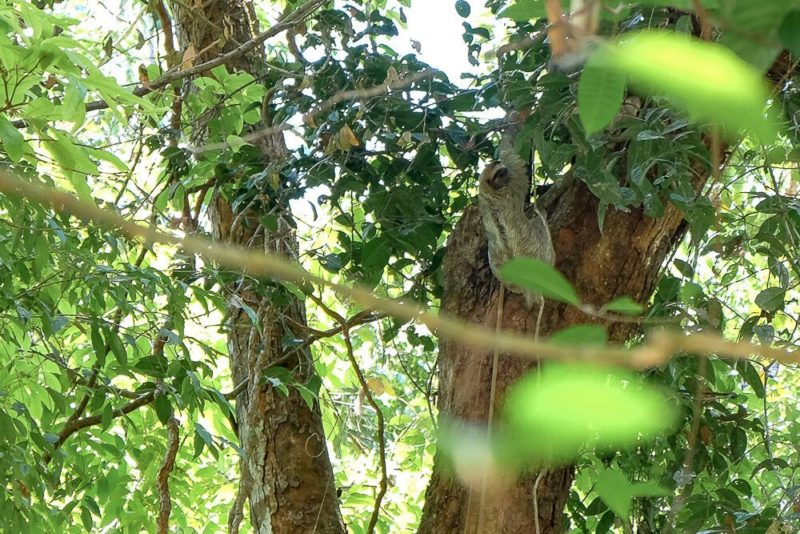
Confession. I was obsessed with seeing a sloth during our trip. And by this, our last full day, I had yet to see one.
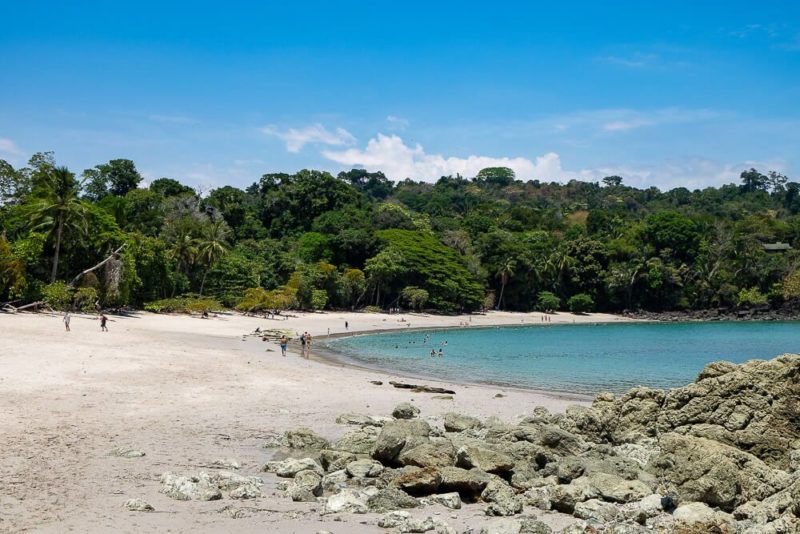
I had no interest in going to Manuel Antonio. It was not on my original Costa Rica itinerary. Manuel Antonio is crowded. Touristy. And everything I hate about traveling. But another couple in Uvita had told us it was thick with sloths.
And so, with the hope that we would see one, we planned to stop by Manuel Antonio on our way to San Jose.
Did we sloths? Oh hell yes. We saw like 6. And I loved how slowly they moved. Like I know they are sloths, but actually watching them was like having time slow down.
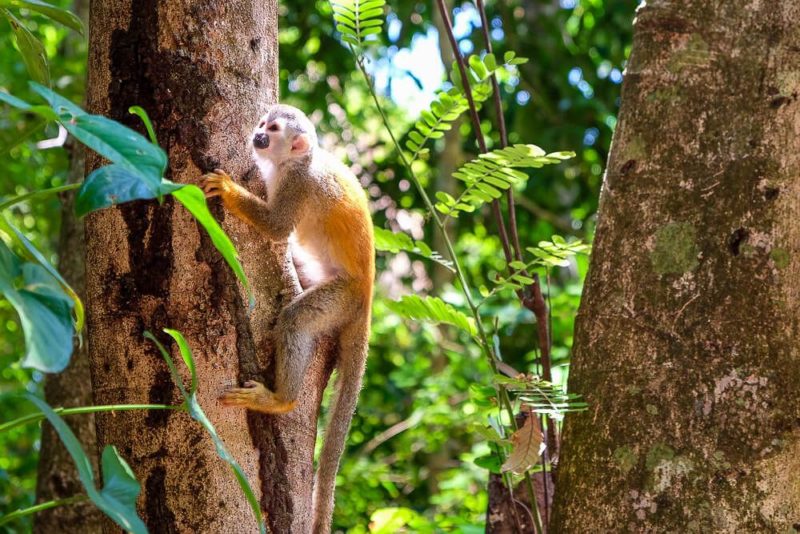
And then there was the beach. And the monkeys as well. (My favorite being the spider monkeys.)
But would I recommend Manuel Antonio? No. Not unless you are desperate. Read about my experience here.
Read Next: Searching For Sloths At Manuel Antonio National Park
After leaving Manuel, we headed to our B&B by the airport. We had an early flight the next day and wanted someplace close by. We couldn’t have made a better choice.
Also the traffic around the airport is horrible in the evening. Plan on it taking you longer than you think to reach your place.
Day 10: Time To Head Home
Our flight was in the morning unfortunately. So after grabbing breakfast at our B&B and dropping off the car, we headed to the airport. Amazingly the traffic was much better in the morning and we arrived at the airport with plenty of time.
Where To Stay In San Jose
Casa María Aeropuerto B&B. This is a small little B&B near the airport and our car rental agency. They were friendly, rooms were clean, breakfast was good, and they had free parking. It was everything we were looking for.
Oh and the owner even offers a limited dinner (for extra) if you just want to walk next door to eat. Which we did since the traffic was horrible.
How To Get Around Costa Rica
There are basically three main ways.
By local bus. This is doable. And the cheapest. But will take a lot more time. For that reason alone we didn’t do it. But if you are interested, I would suggest checking out this article.
By tourist bus. This is basically small shuttle vans you can hire to take you between the main tourist destinations. It’s more expensive (think $50/person). But can be a lot faster. We wanted the flexibility of a car, but this was a close second choice. If you are interested, I would suggest checking out this article.
Rent a car. This was our choice. It was very expensive. (You have the car, gas, parking costs, and tolls.) But it gave us the freedom we wanted for such a short trip. And you may need an SUV also if you plan on being on dirt roads (like the road into Monteverde).
After looking online, I decided to go with Adobe based on a few recommendations I saw. This is a local company and I found a good deal online. For more information, definitely check out this article with lots of advice and a great deal!
Don’t forget to save a few colones for tolls coming back into San Jose – we almost ran out of cash to pay these! You’ll only need a few 1000 colones, but just make sure you have it!
Read Next: 10 Days in Costa Rica: How Much Does It Cost?
In The End
So how was my first journey into Central America? Amazing. Eye-opening. Beautiful. Only slightly difficult. And filled with such great memories.
Soths, sea turtles, coffee, toucans, hiking, snorkeling, waterfalls, surfing, a lot of rice and beans, sunsets, beaches, monkeys, mountains, quetzals, great people, cloud forests, and more.
I hope this is not the last Costa Rica itinerary I put together.
Pura Vida!

What time of the year did you go in?
We went in the spring – end of March to be specific! Hope that helps!